Why should you read this blog post? Because you’re farming for loot, you’ve done 10 kills so far and no item has appeared. Is the game bugged? The drop was 10% it should’ve dropped right? Well I have attached charts below to help you know if you’re unlucky.
Goal: To teach about the use of confidence intervals to better understand what drop rates mean to a player of Borderlands 3. To provide calculated confidence intervals for drop rates in Borderlands 3.
Questions that you be able to address with this blog post:
- I farmed Killavolt 30 times and I only got 1 Monarch, am I unlucky?
- Answer: no! 95% of players after farming Killavolt witness 1 to 9 Monarch drops.
- I farmed Minosaur 20 times I got 0 flippers, am I unlucky?
- Answer: Yes! 95% of players after farming Minosaur (not Killavolt, thanks Mastersord) witness 3 to 11 Flippers.
- Infact that result is a 1/3010 chance. You’re actually really lucky in your unluckiness.
- Answer: Yes! 95% of players after farming Minosaur (not Killavolt, thanks Mastersord) witness 3 to 11 Flippers.
- I want a urad annointed Hellwalker, how many times do I have to farm
the dedicated drop to get that?
- Answer: Assuming 10%/30 chance of getting a Hellwalker with your urad annoint it’ll take you to farm 1150 times before 95% of players will have 1 to 8 Hellwalkers. Good luck.
Borderlands 3 is a looter shooter, a game where every enemy turns into a slot machine. Enemies drop items and these items are randomly generated from “loot pools”. That is categories with weighted probability. For most players this means that items of different rarities are “dropped” or emitted by defeating an enemy or a boss.
The rate at which a particular item is dropped from an enemy is called the drop rate and it is usually a percentage (0 to 100%) or a probability (0.0 to 1.0).
For instance according to Lootlemon the Hellwalker has a 10% chance or 0.1 probability to drop from Road Dog in the Splinterlands. This means that every kill of Road Dog should roll a random number (like a slot machine pull) between 0 and 1.0 and if that number is 0.1 or less then a Hellwalker shotgun should drop from Road Dog. You might think this means that for 10 kills of Road Dog you should get 1 Hellwalker. What if I told you that after 10 kills you had a 35% chance of not getting a Hellwalker? Why? Because there’s a 90% chance to not get a hellwalker, so the probability of not getting a Hellwalker 10 times is the product of 0.9 10 times or 0.9 to the power of 10. In fact it takes about 29 kills before we have less than 5% chance of not getting any Hellwalkers. We’re dealing with probability and random chance every run is not the same. For the purposes of this blog post we’ll assume that items dropping are considered Bernoulli Trials where the probability or droprate represents the chance of success. So each boss kill is a trial, and a drop of your item is considered a success.
let p = probability of item OR droprate as probability
let t = number of trials OR number of kills

let probability of not getting items = (1.0 - p)^t

Thus for 10% / 0.1 probability droprate
and 10 trials we get:

(1.0 - 0.1)^10 = 0.349 or 34.9%

where as 0 drops for for a 30% droprate
with 10 trials is a lot less likely:

(1.0 - 0.3)^10 = 0.0282 or 2.82%
The chance of not getting an item is quite pessimistic, especially given that for larger droprates (like 30%) that by 10 we can expect 95% of time to have at least item by 10 trials. We can also talk about general expectations and confidence intervals can help us with this.
Confidence Intervals
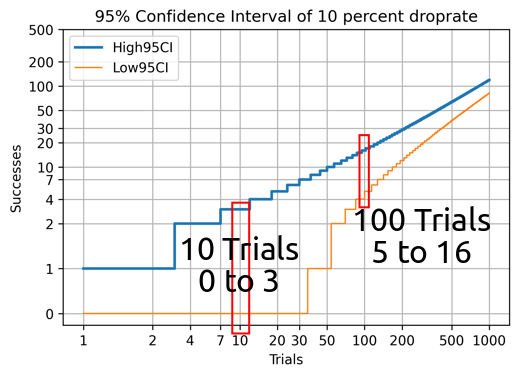
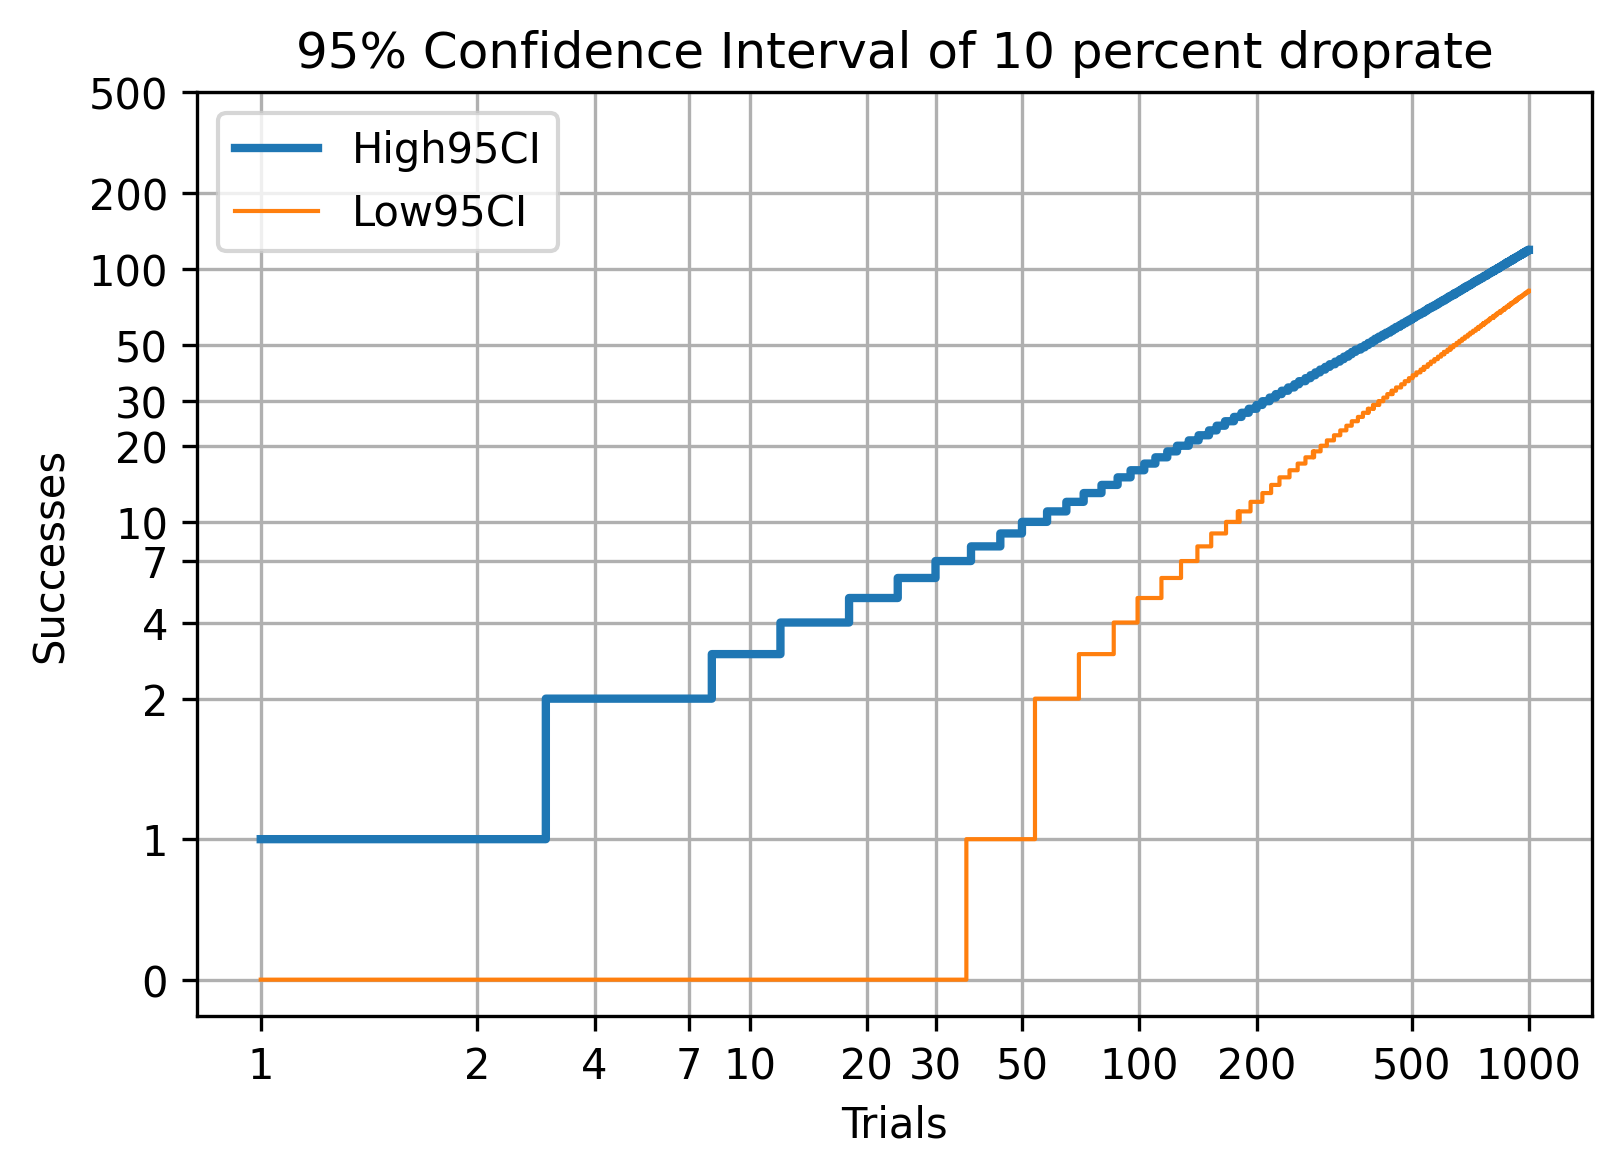
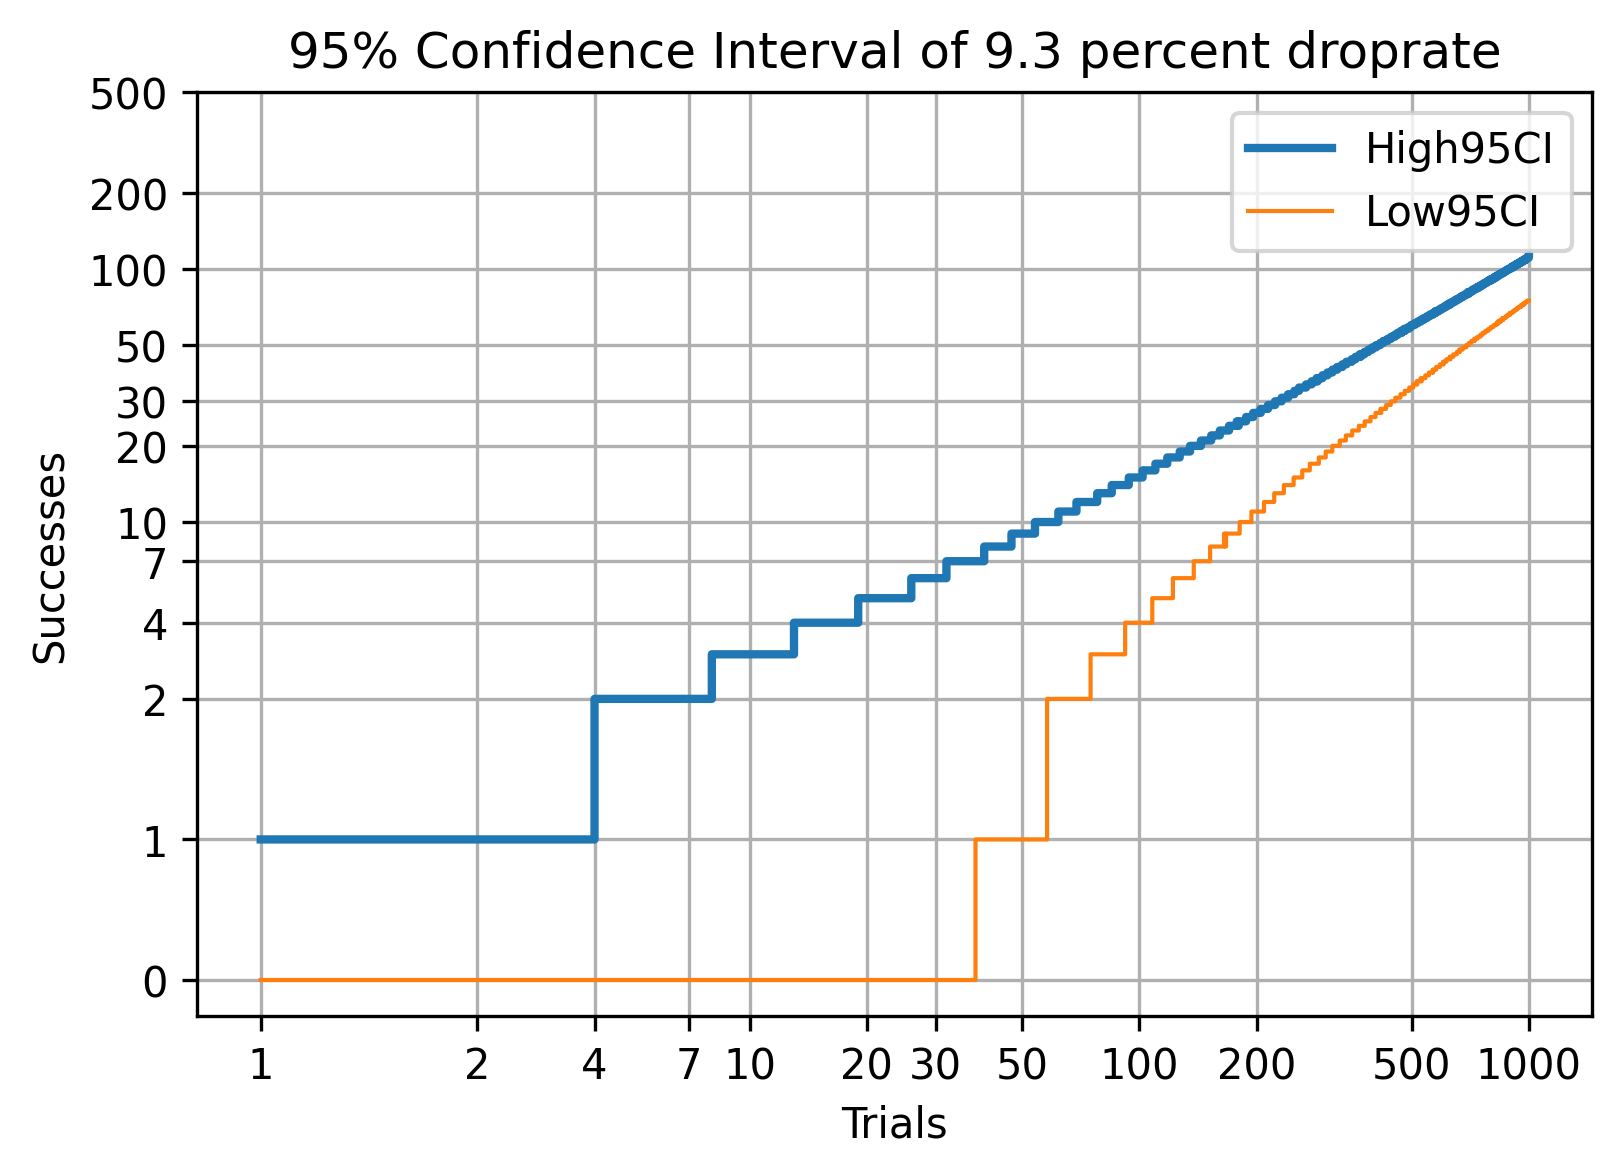
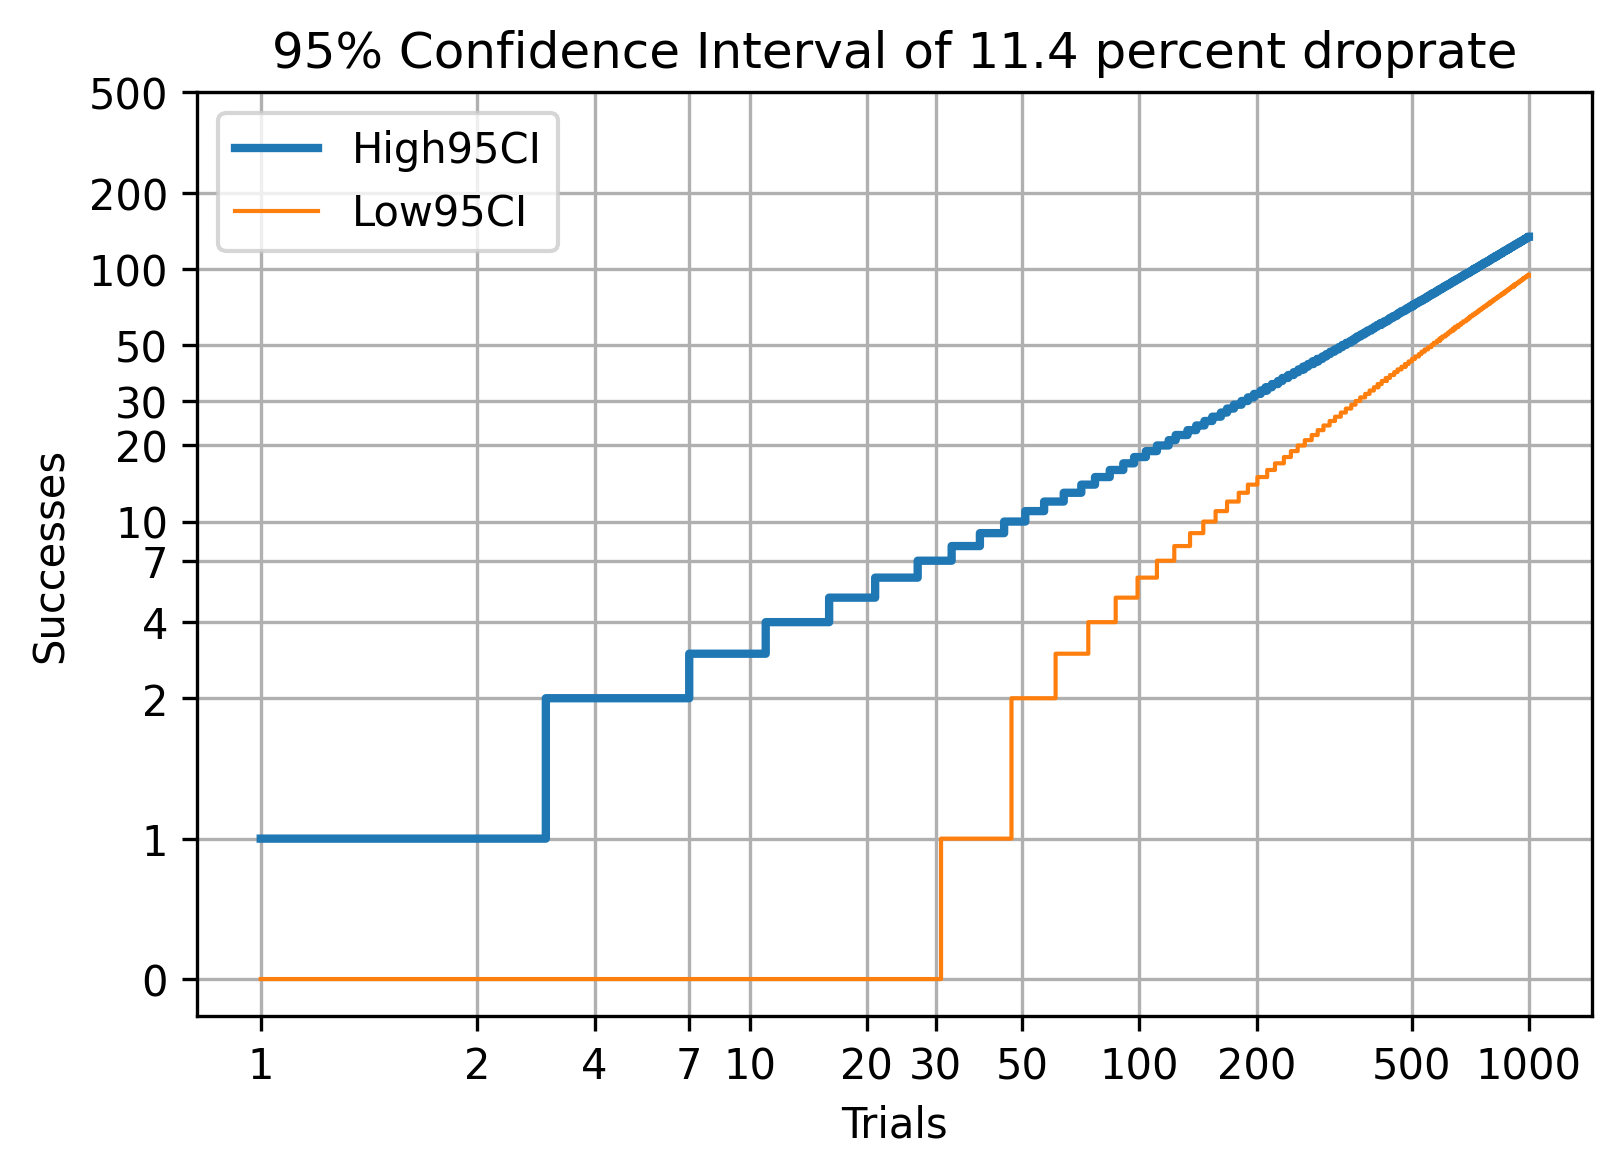
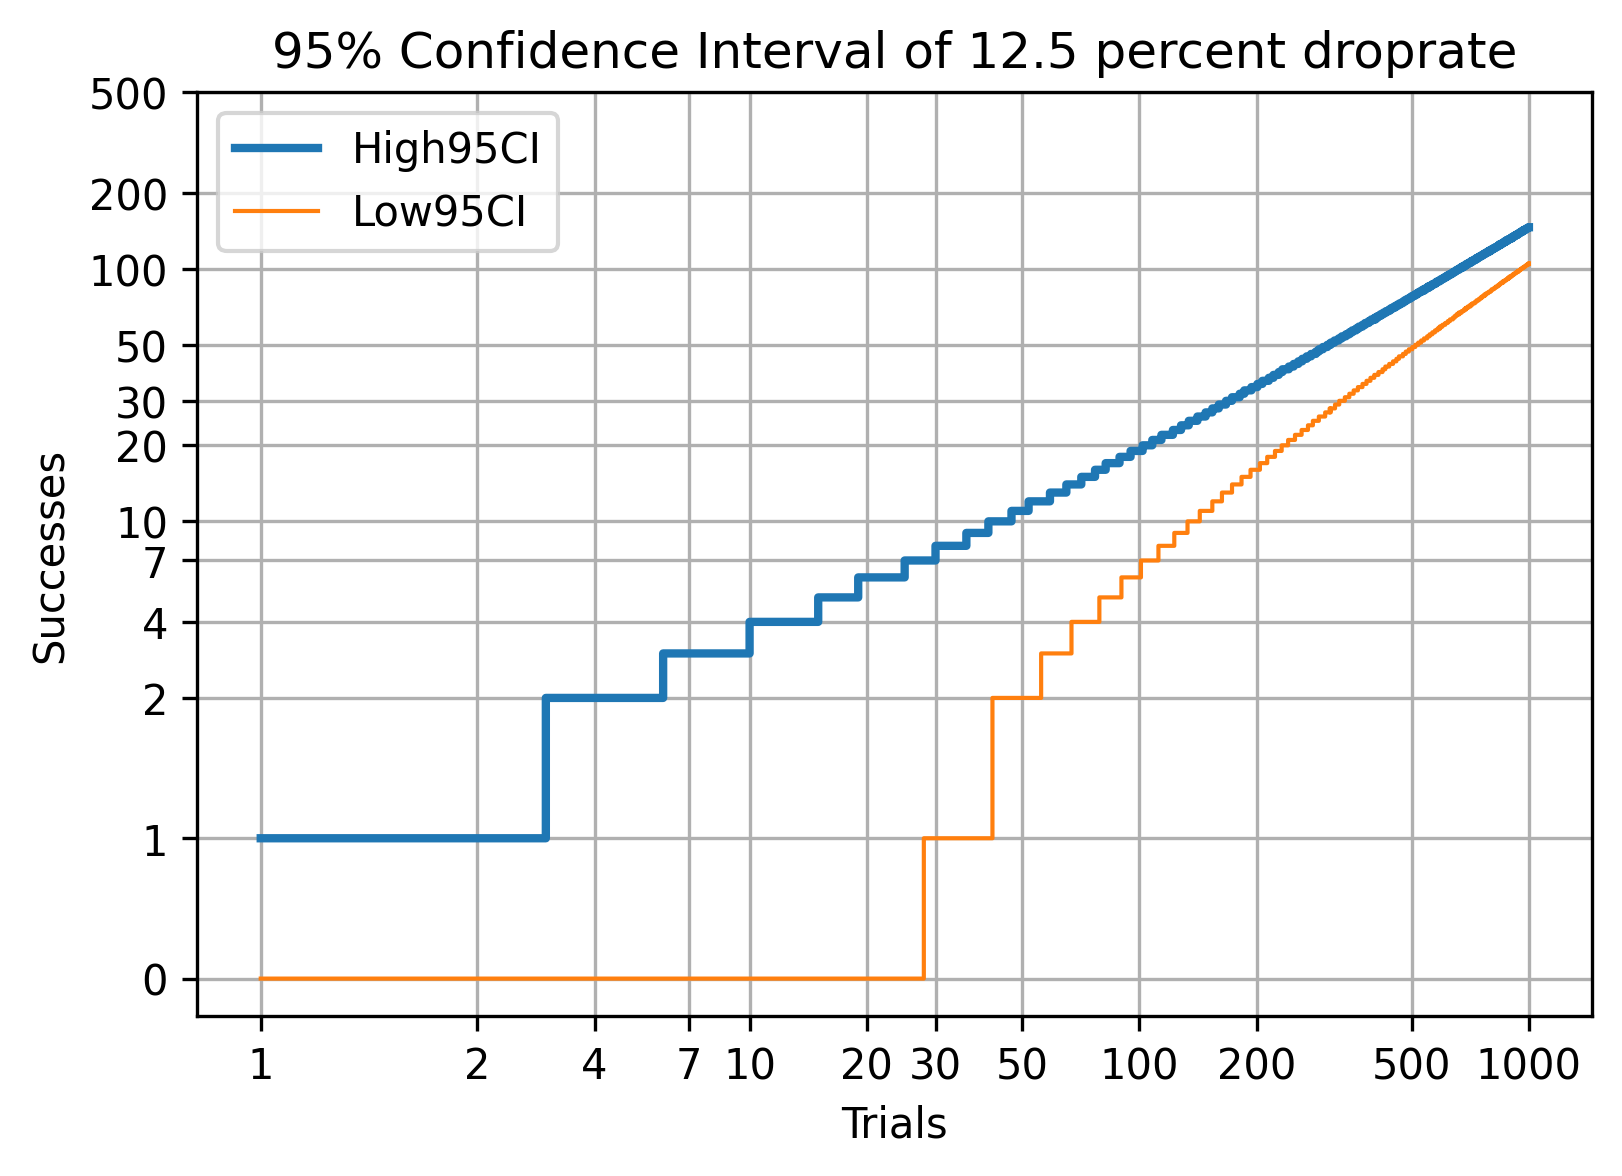
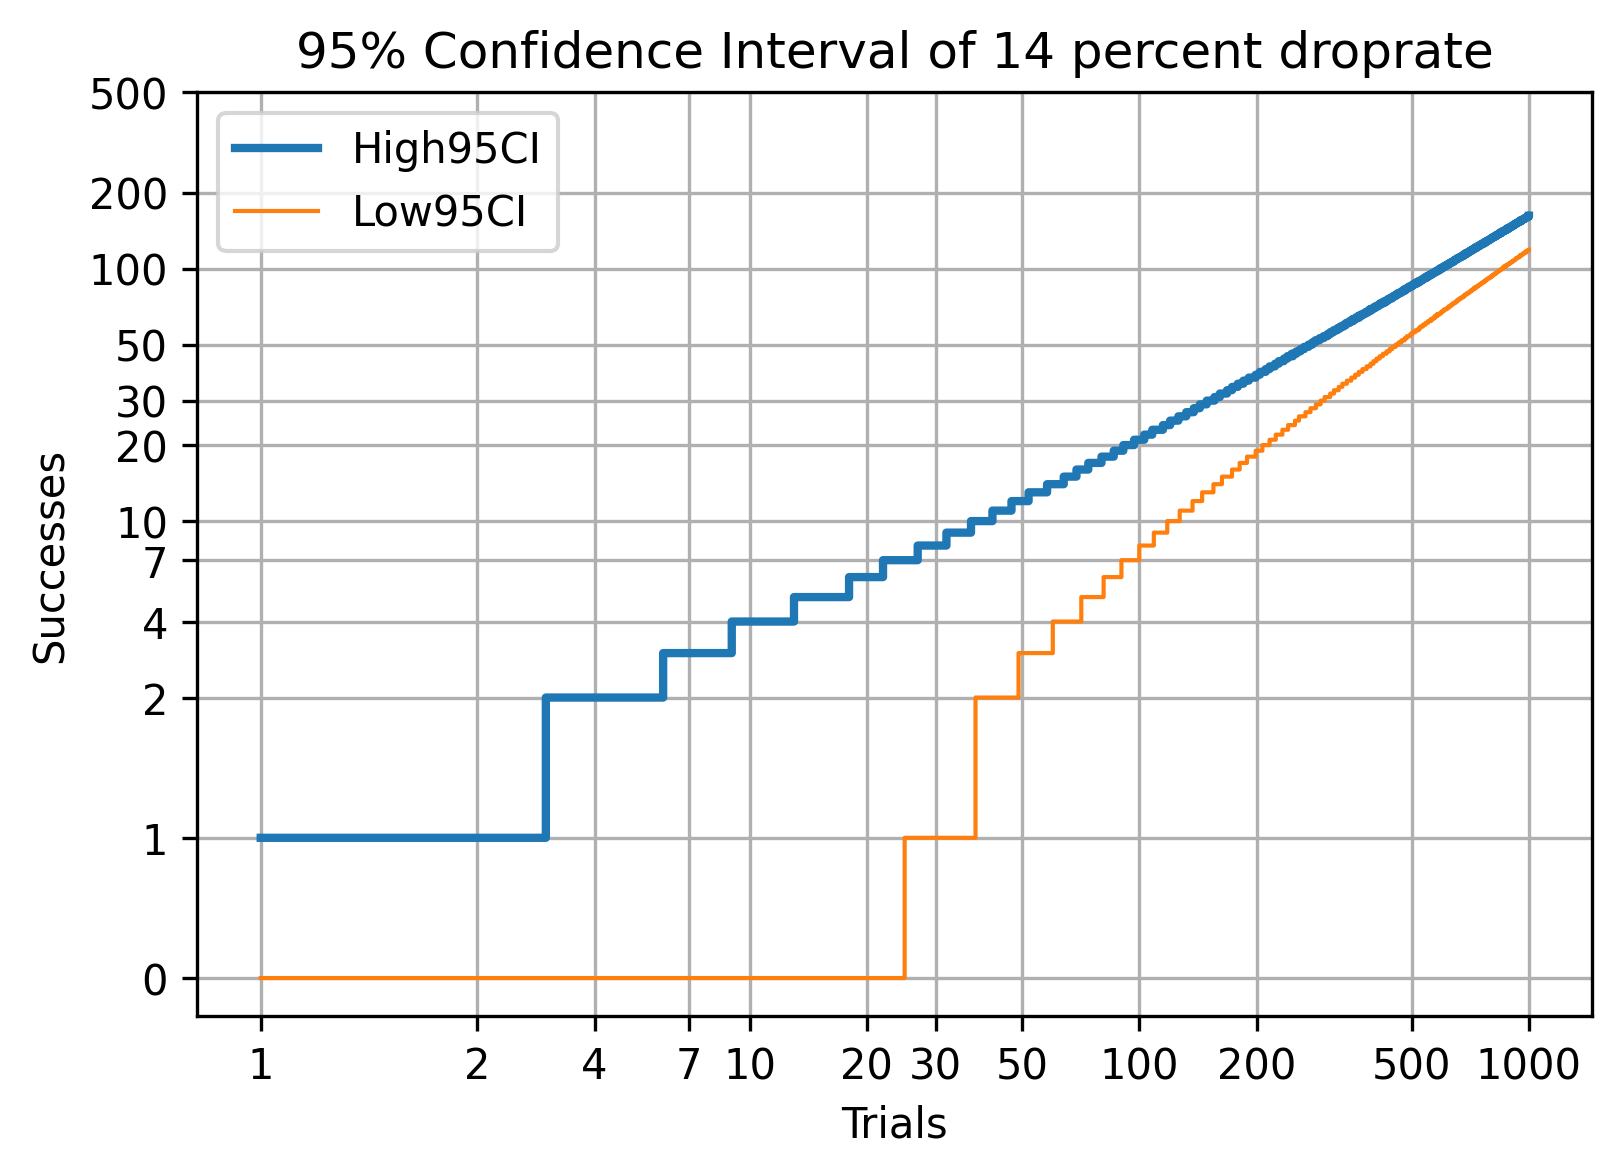
Wouldn’t it be nicer if I could tell you that for a 10% droprate that 95% of player should expect 0 to 3 items after 10 trials.
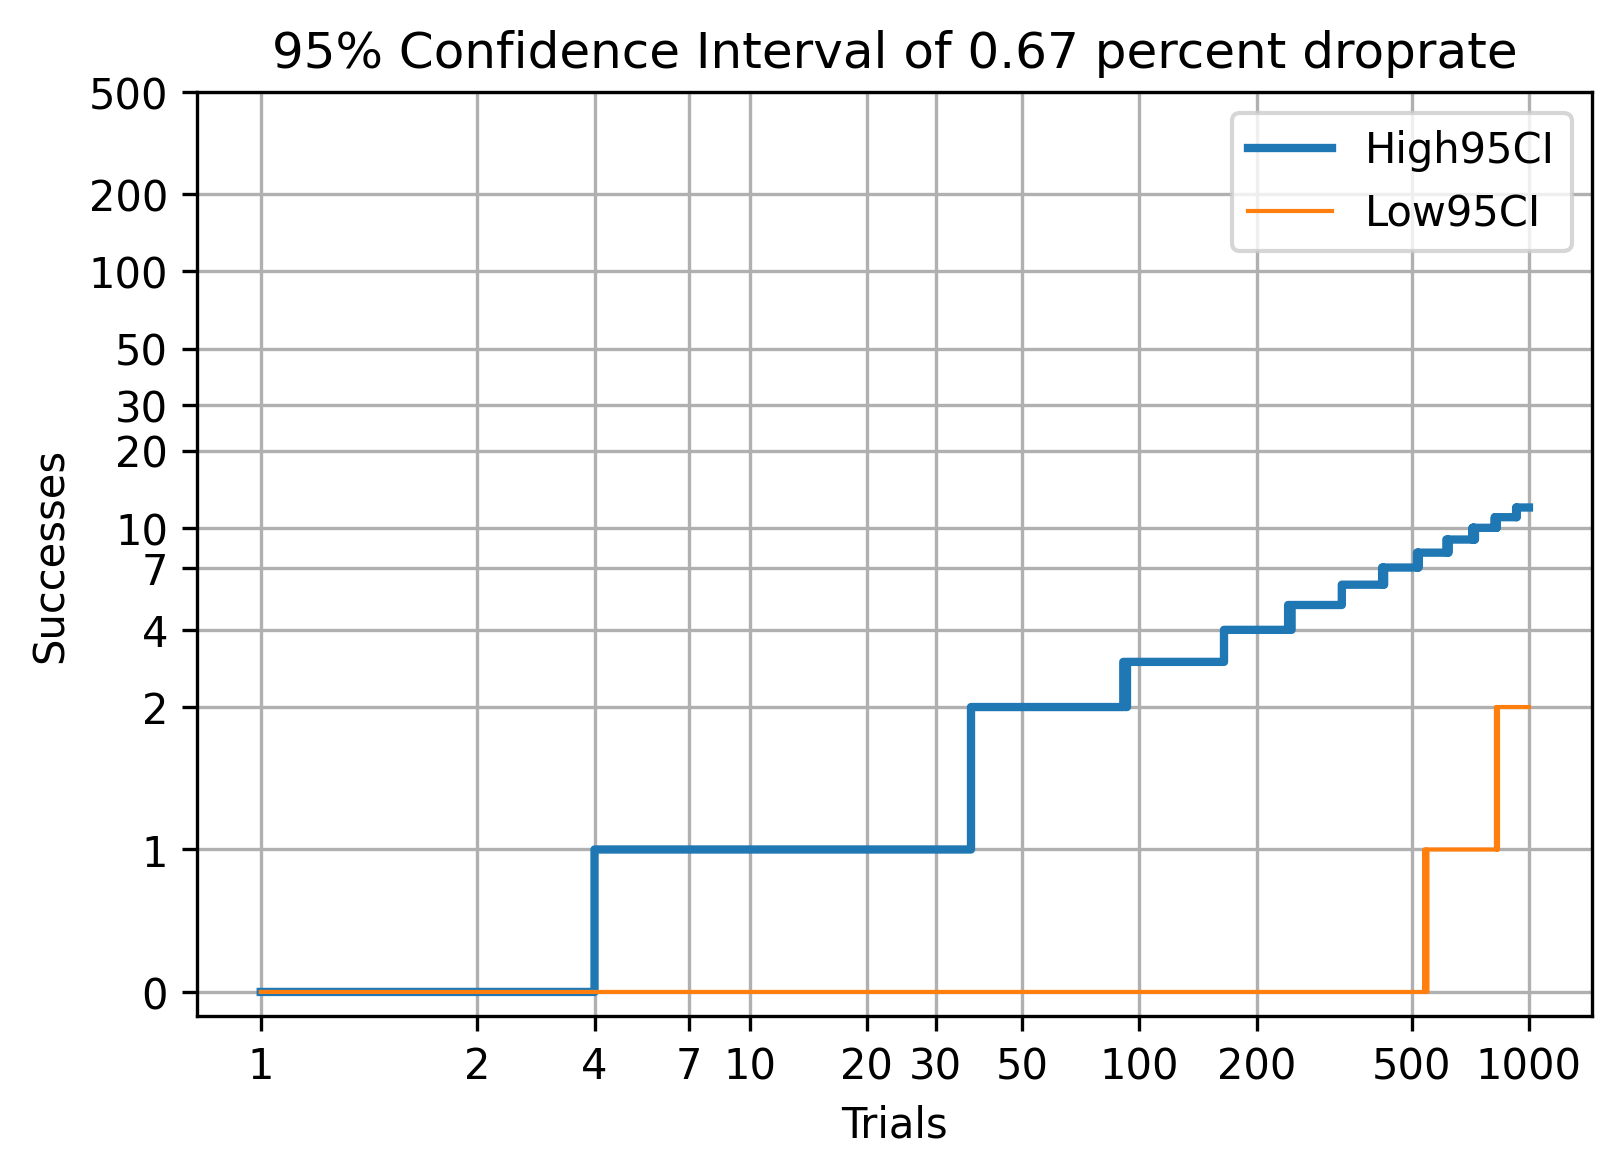
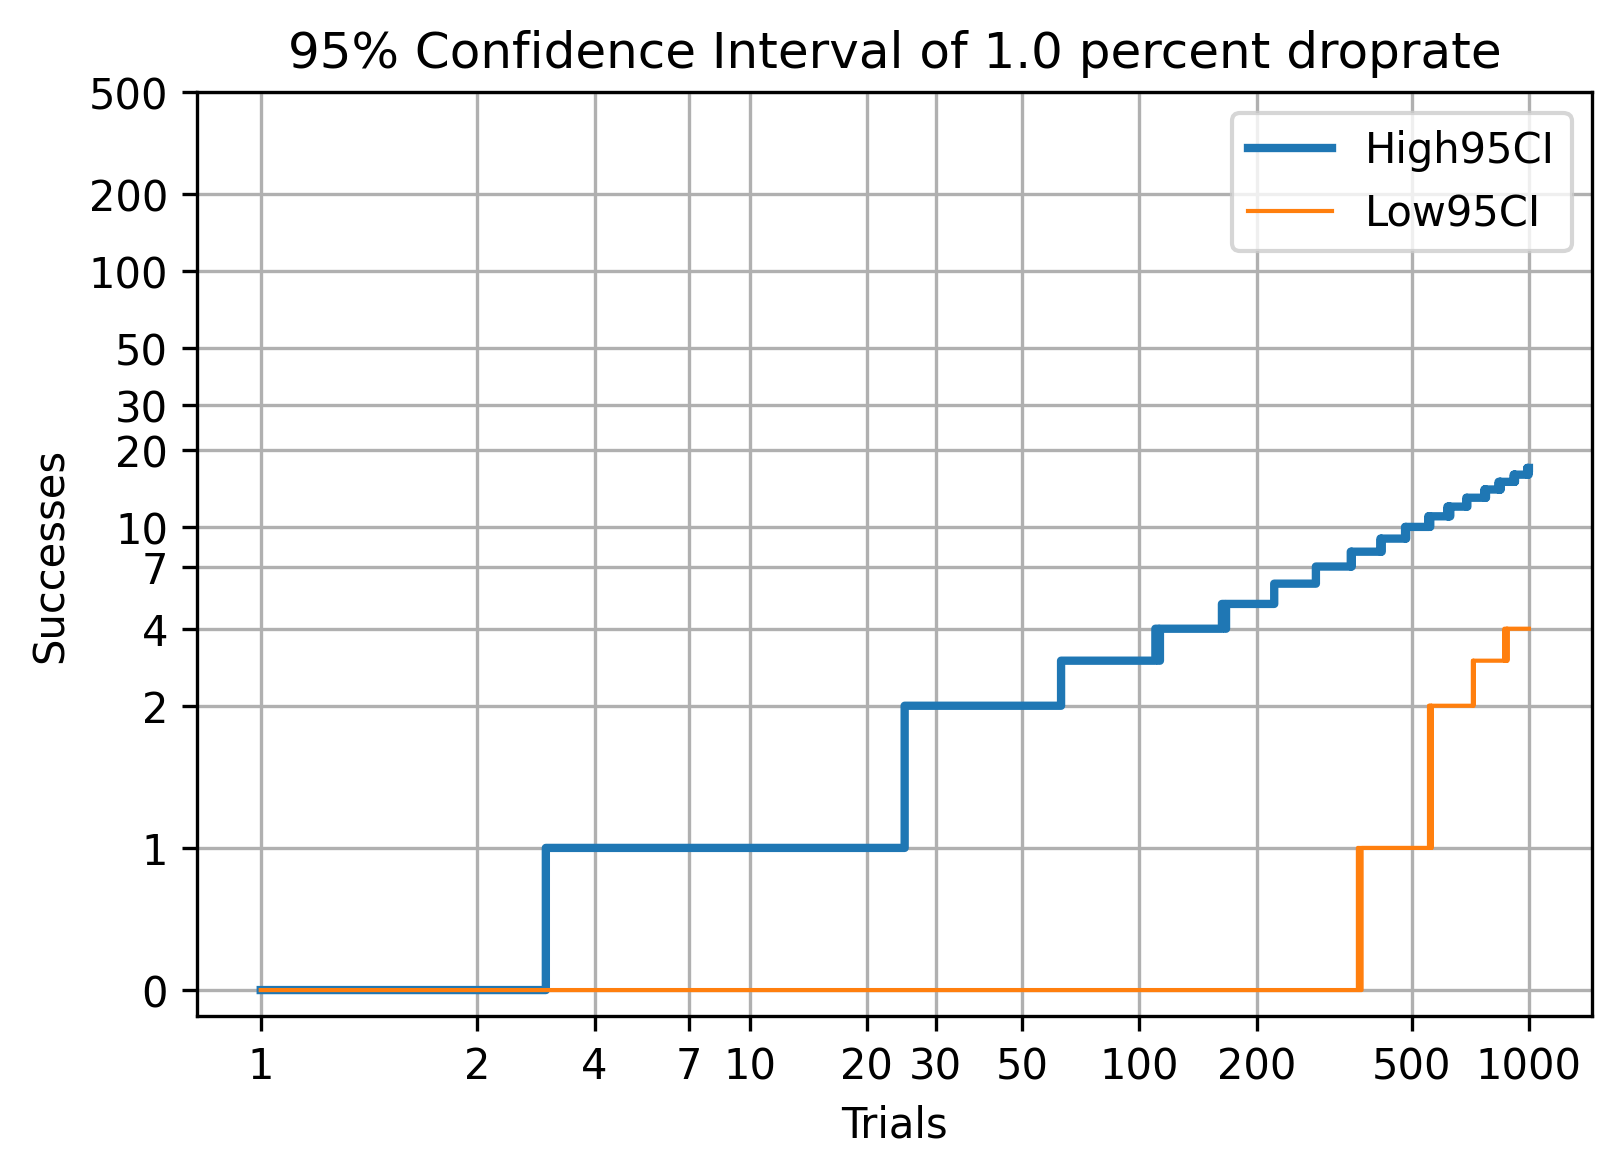
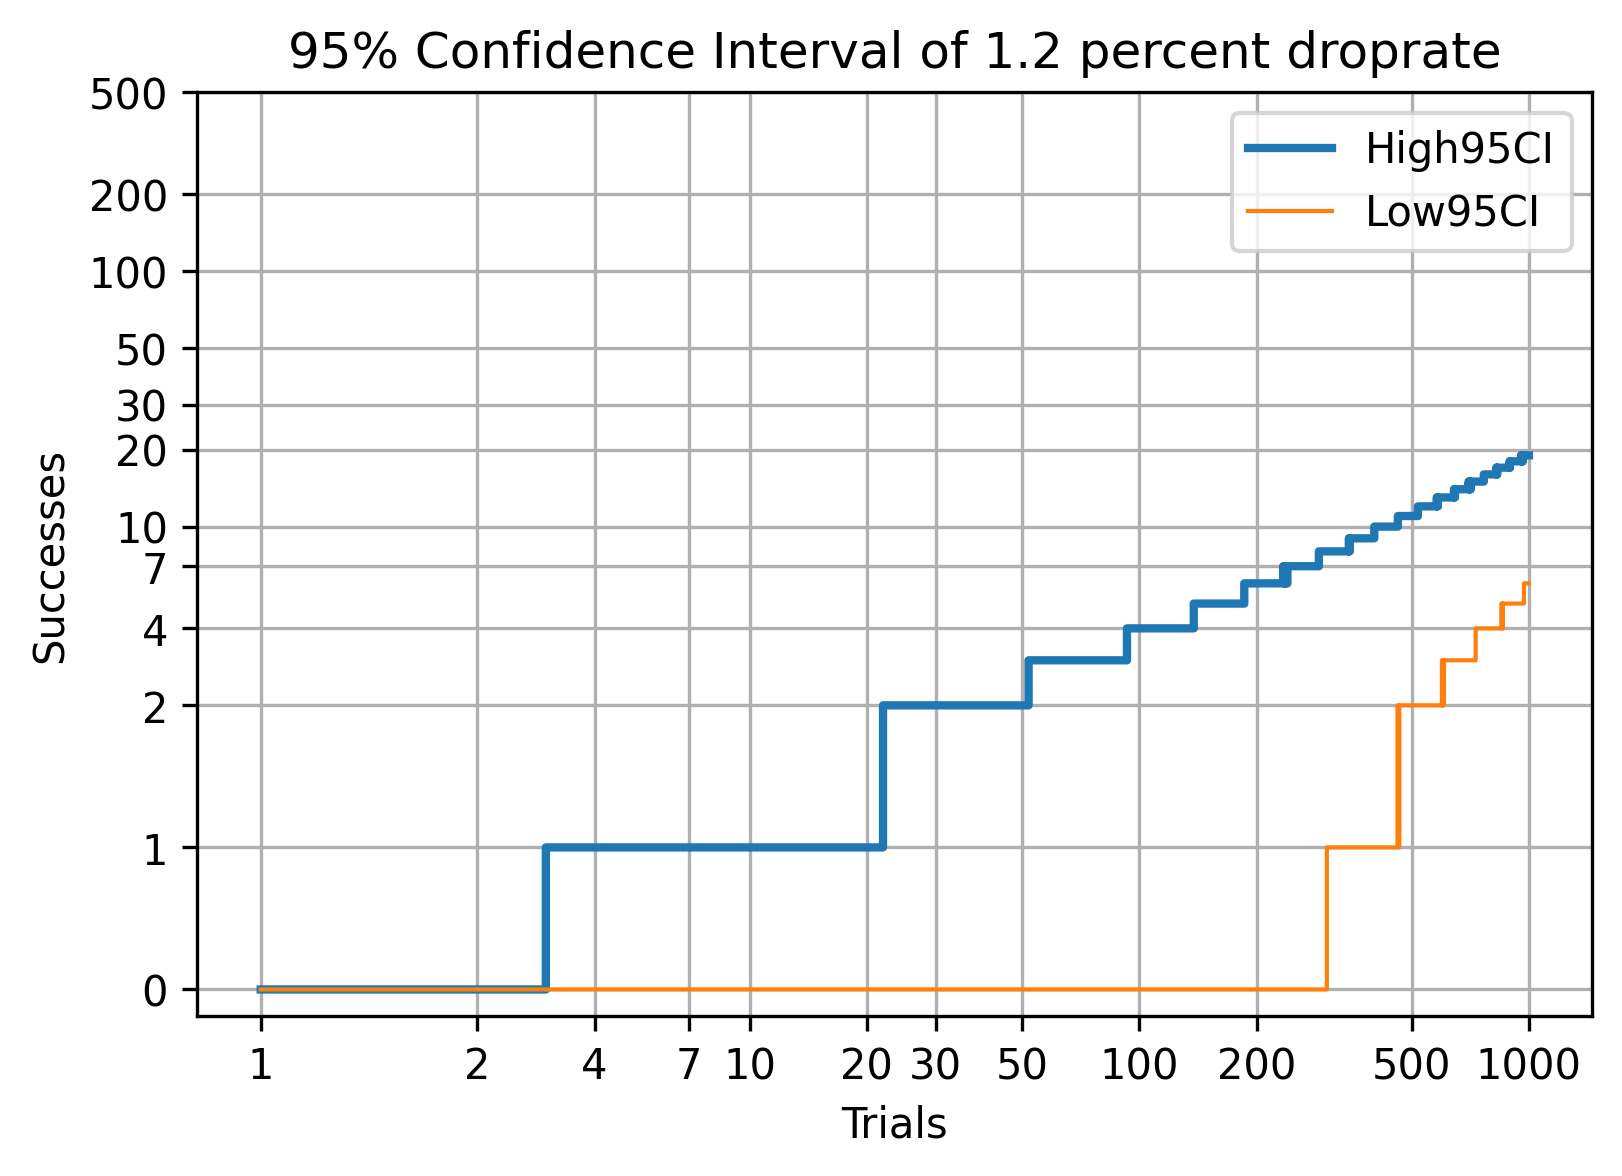
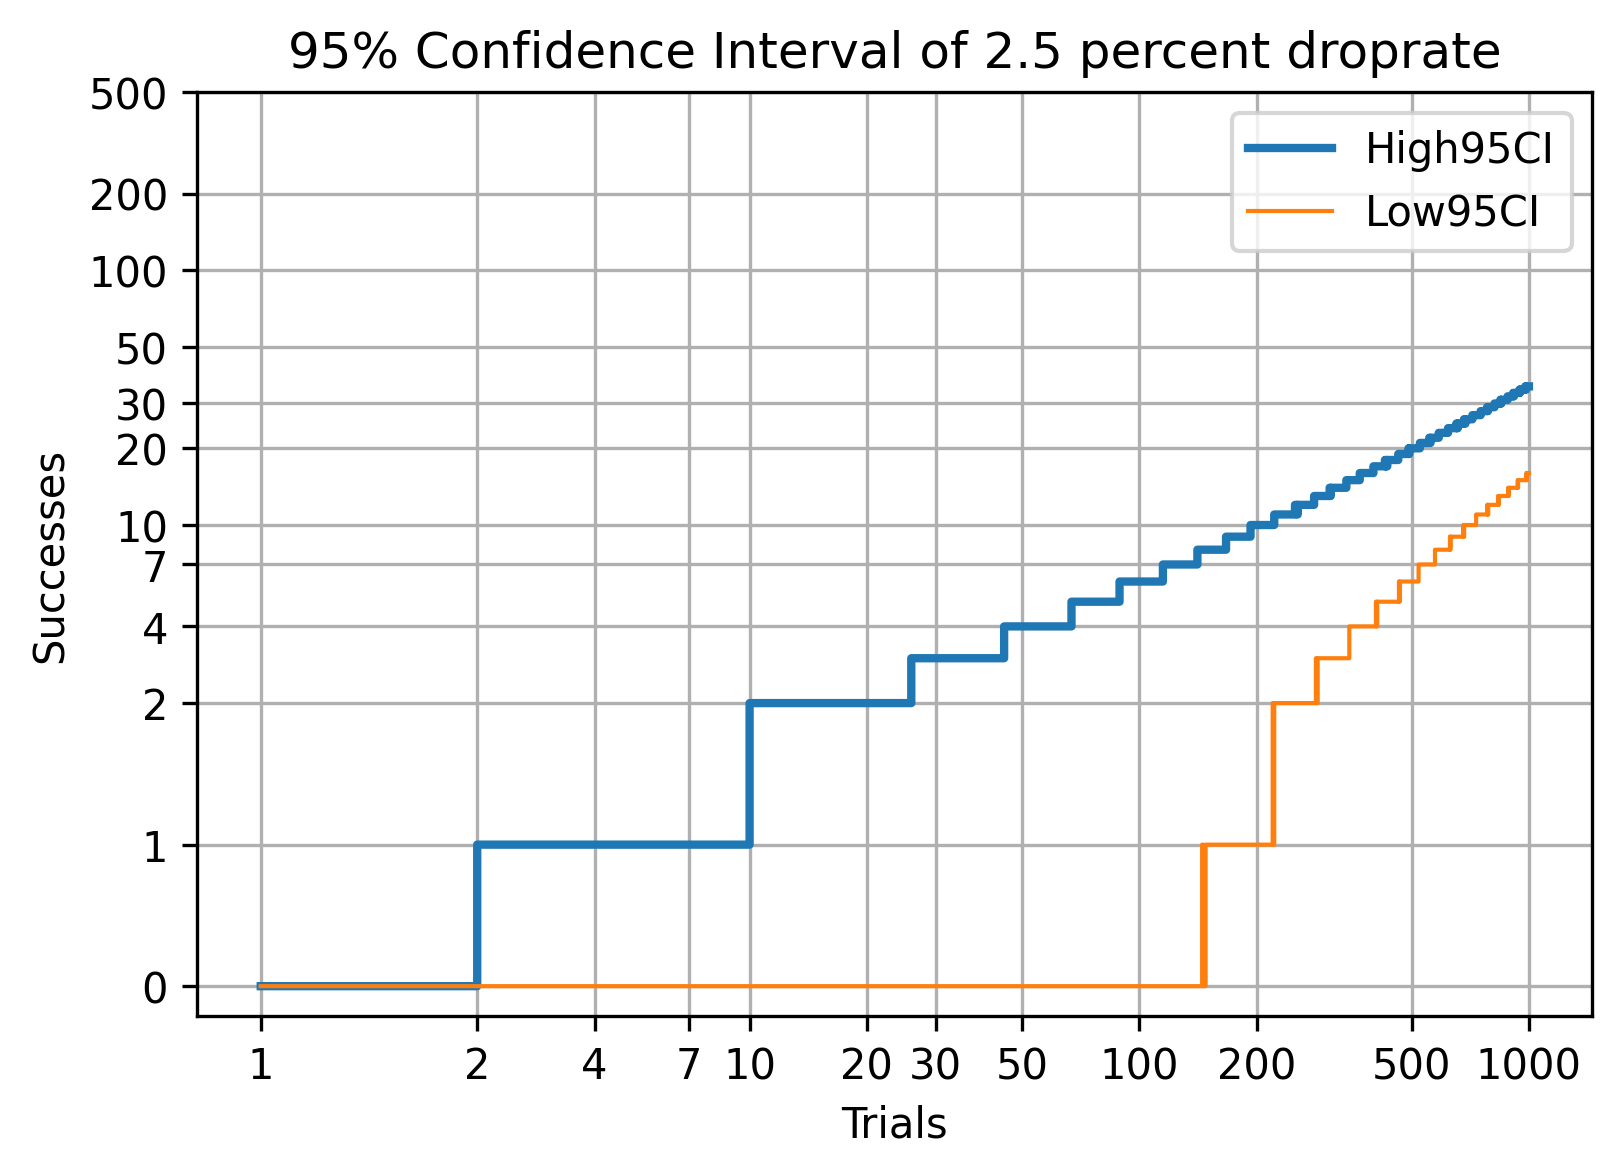
The most common form of confidence interval is called the 95% confidence interval. This is the range of results (count of successes, count of items dropped) that we expect to witness 95% of the time. 95% confidence intervals are not averages, they are a range of results that you expect to get 19/20 of the time. Which typically is the level of confidence reported or expected in most scientific results. This means that good or bad luck results will be in that remaining 5% that exist at the extremes of our results.
I explain how to calculate confidence intervals in this blog post: Statistics and probability for randomized games (loot shooters, roguelites, roguelikes, etc.)
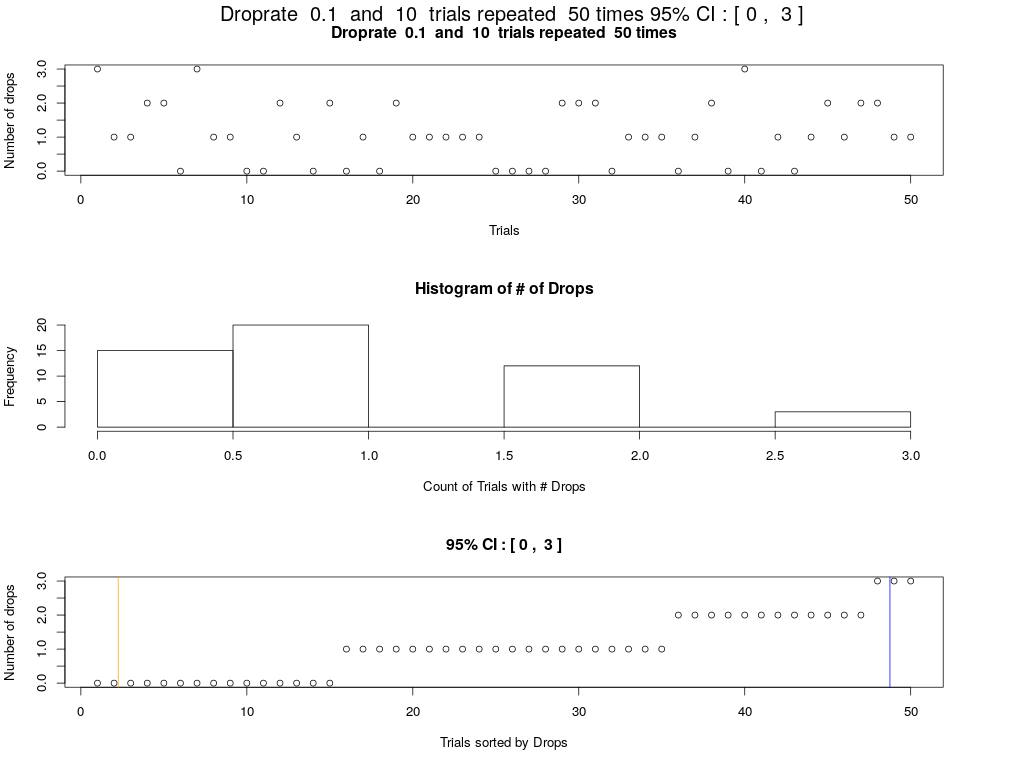
Here’s an example of farming Hellwalkers with a 10% drop rate. We wanted to see the 95% confidence interval for 10 trials. Essentially this is 50 attempts at sets of 10 trials. This allows us to order the sets of trials and produce a 95% confidence interval by removing the smallest 2.5% and largest 2.5%.
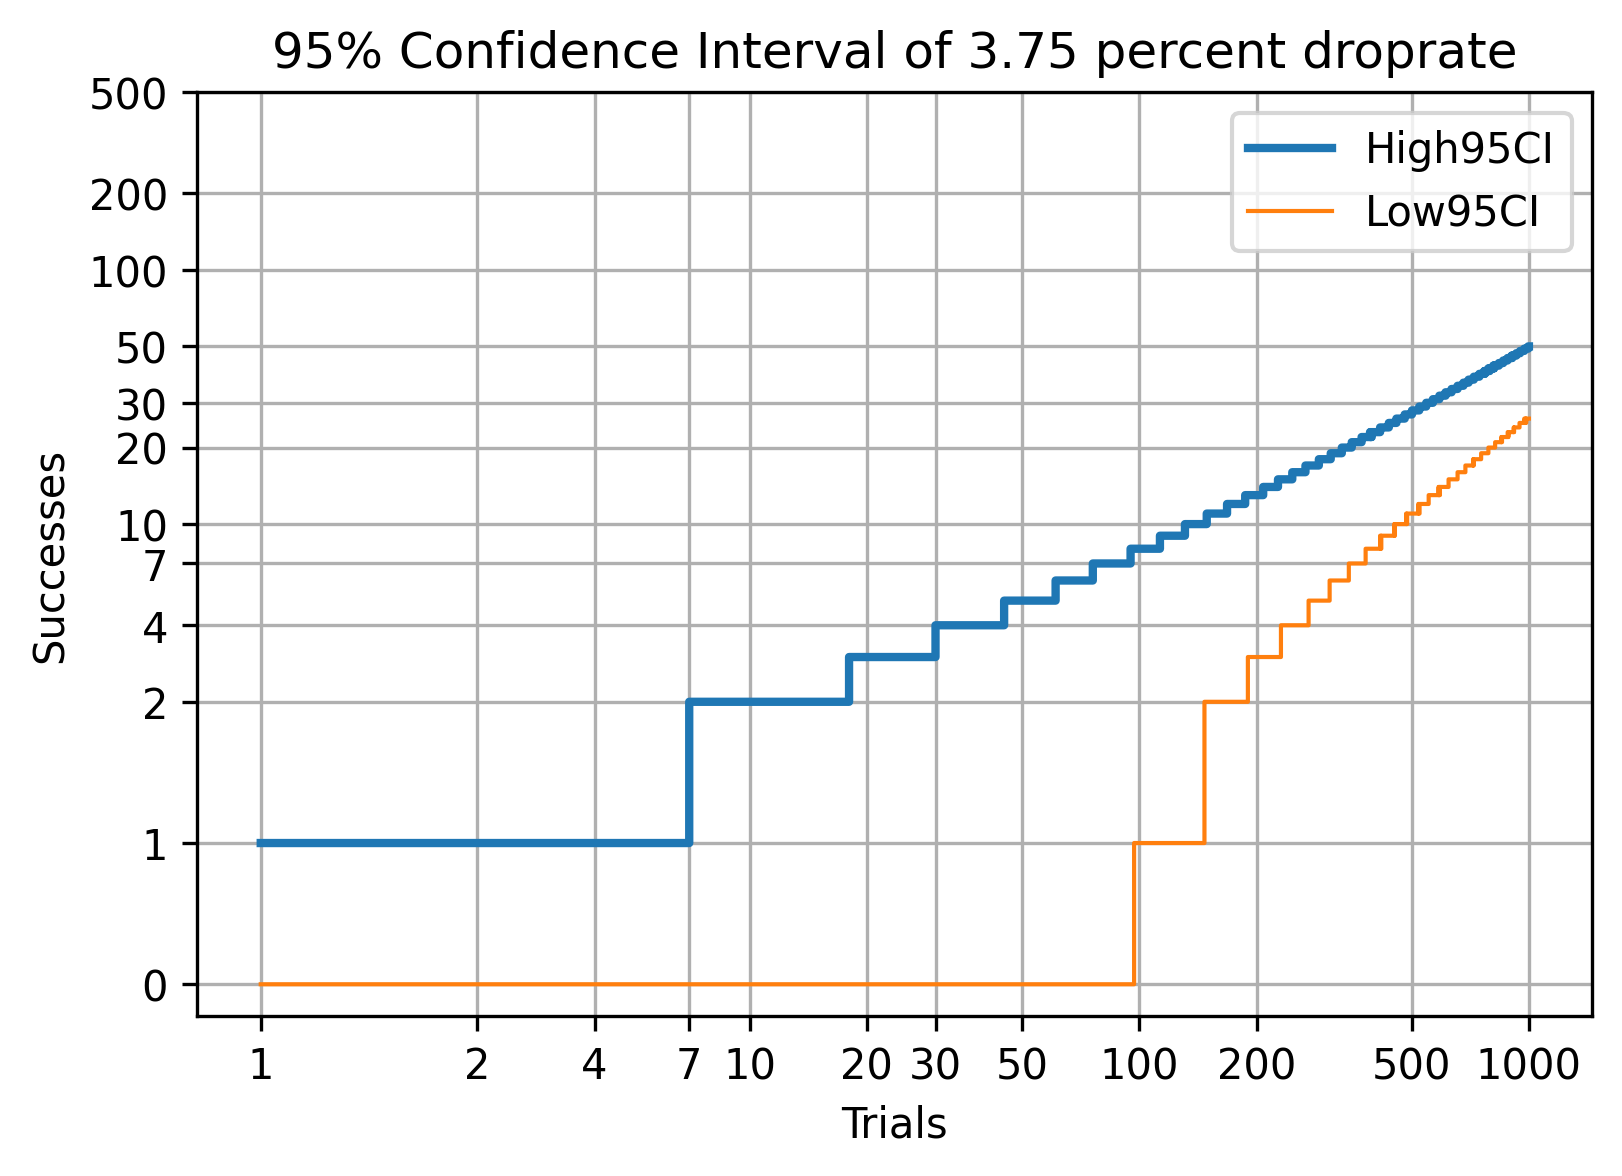
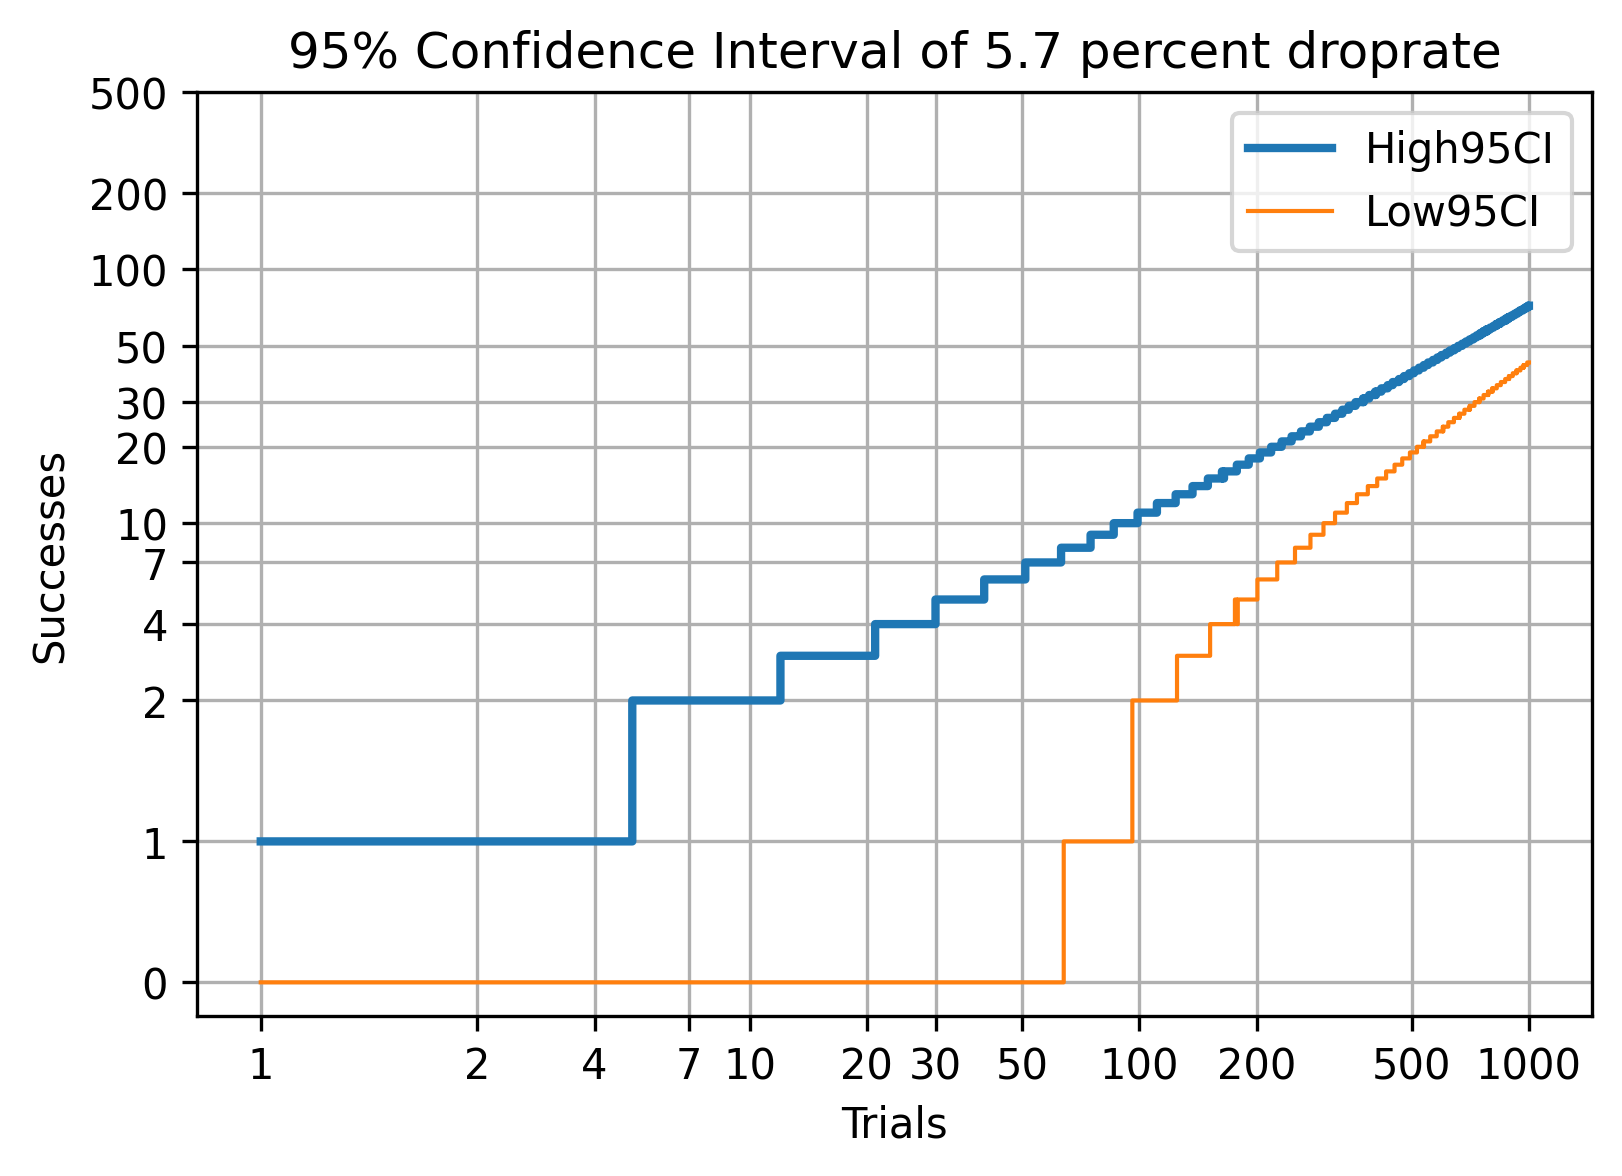
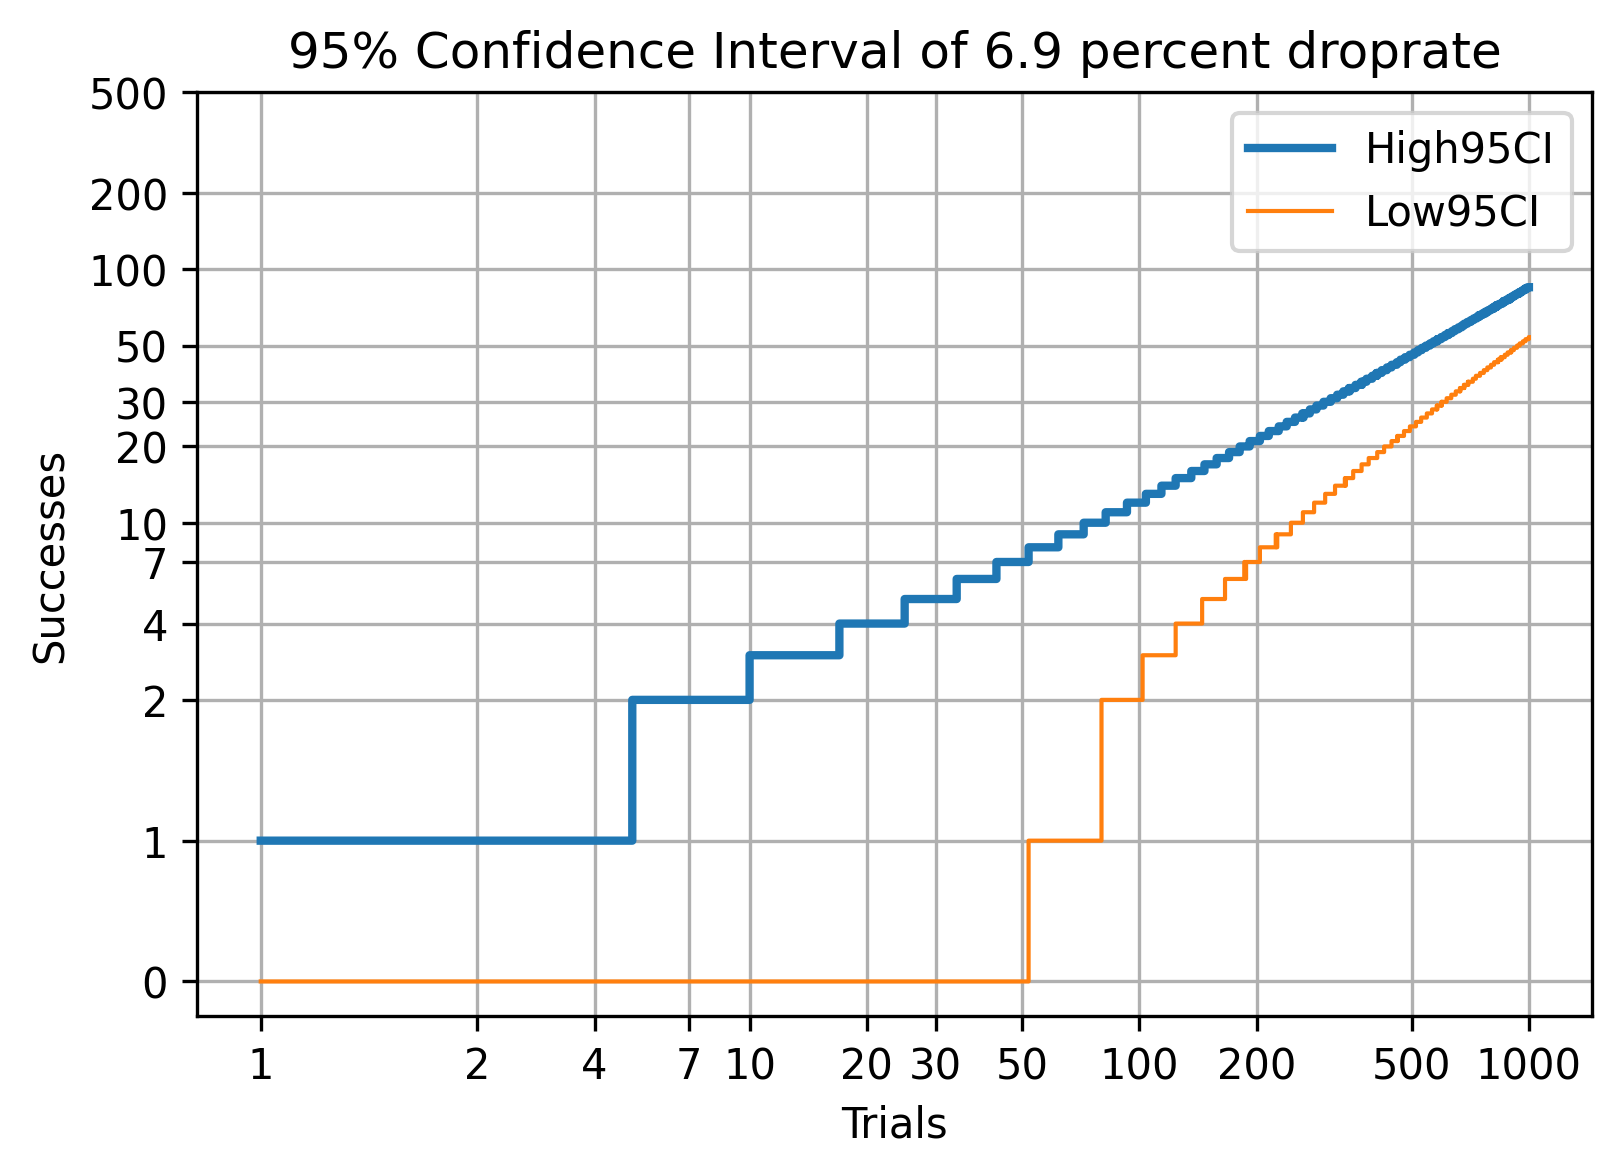
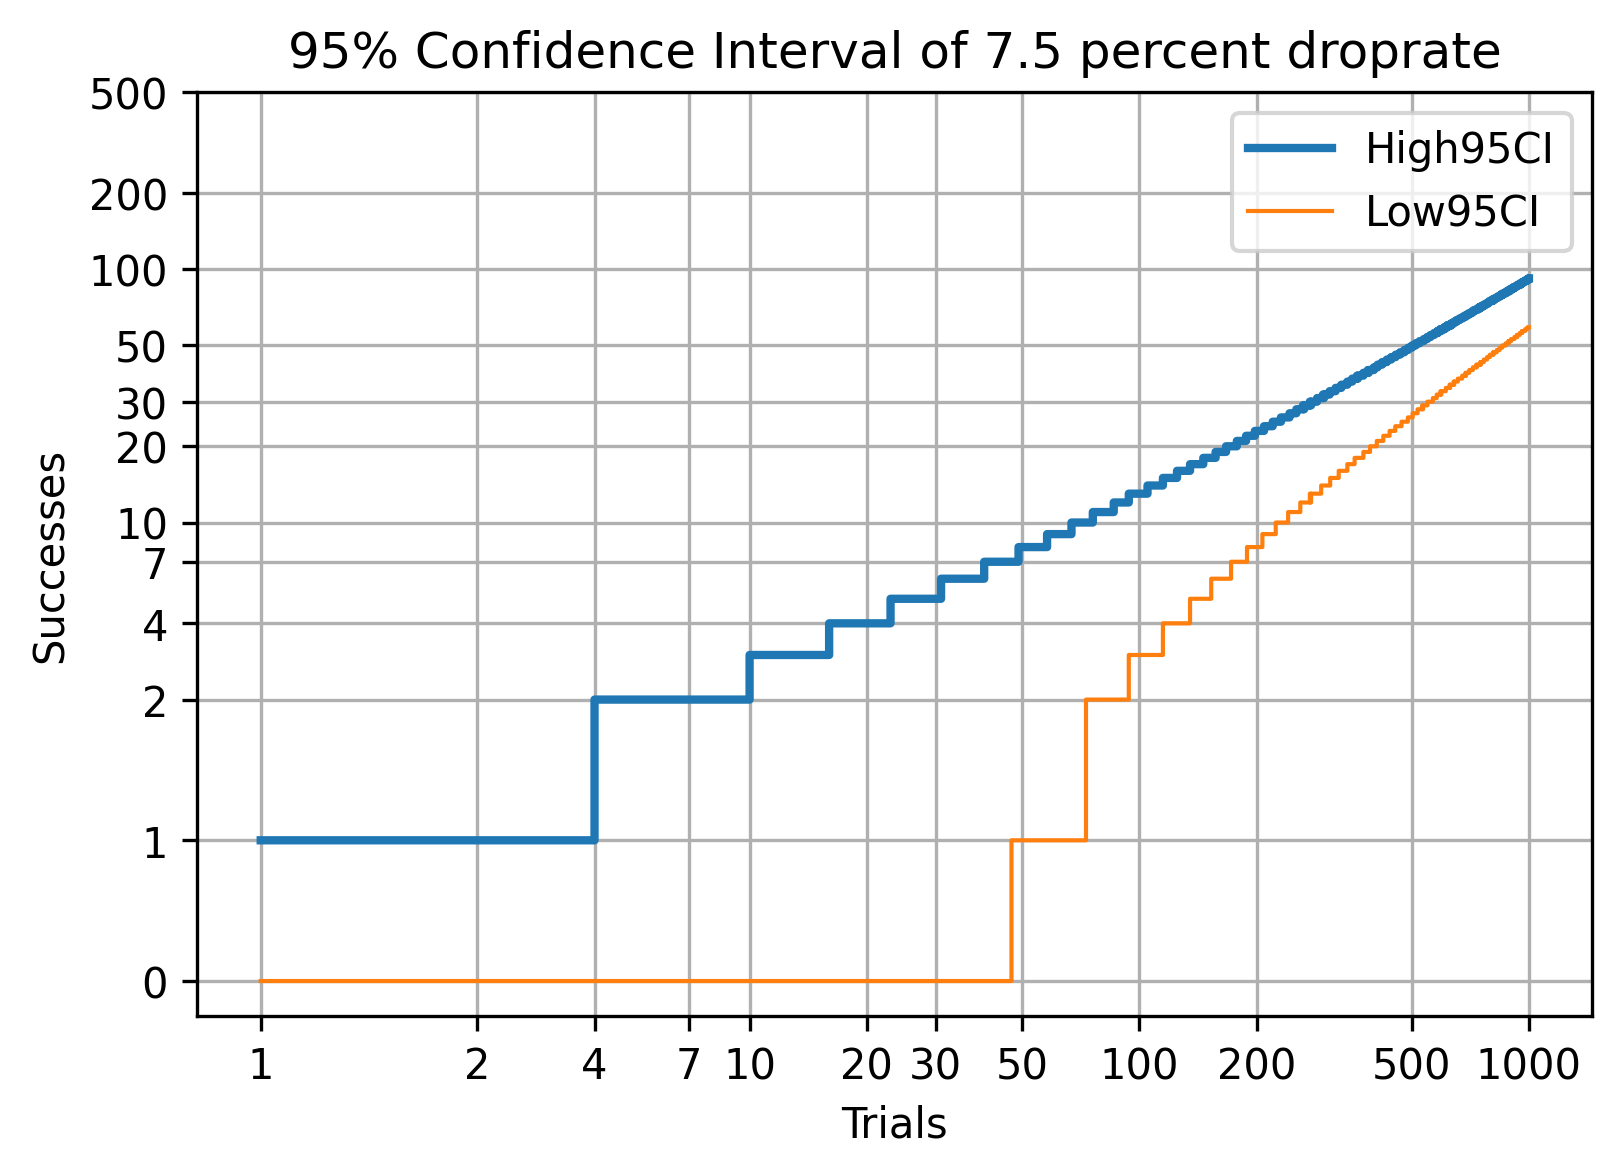
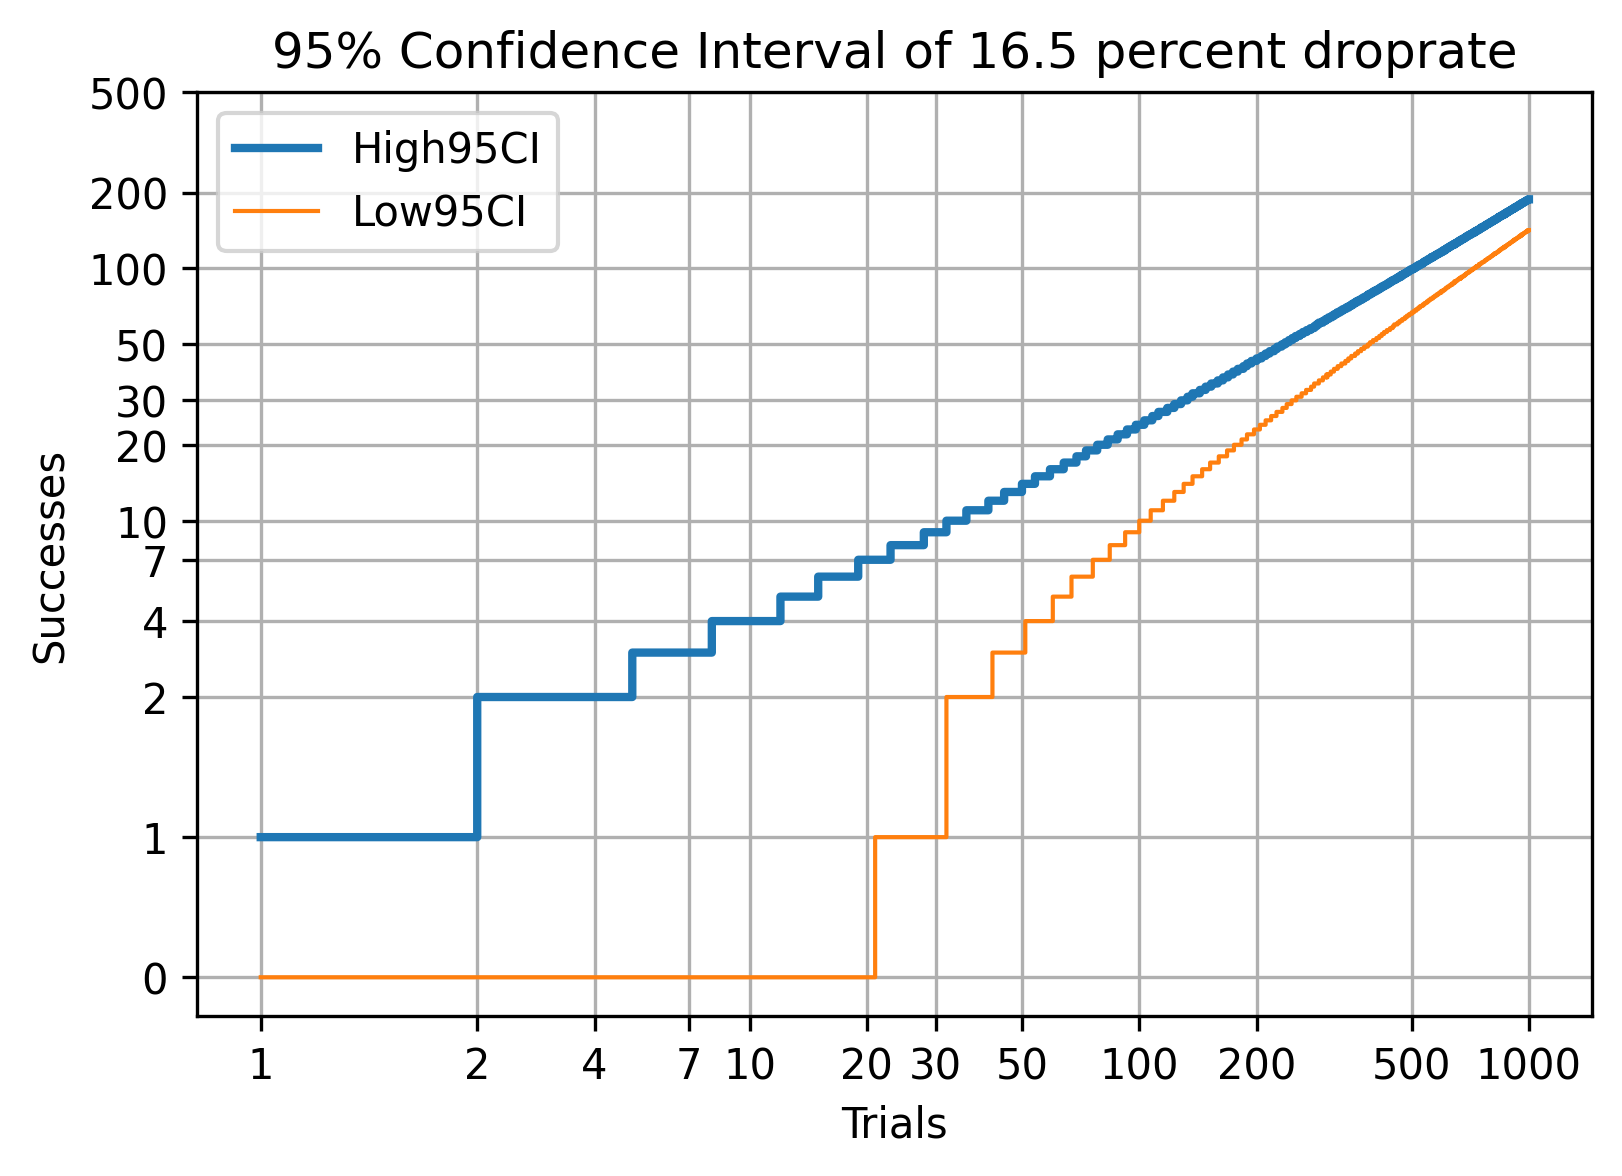
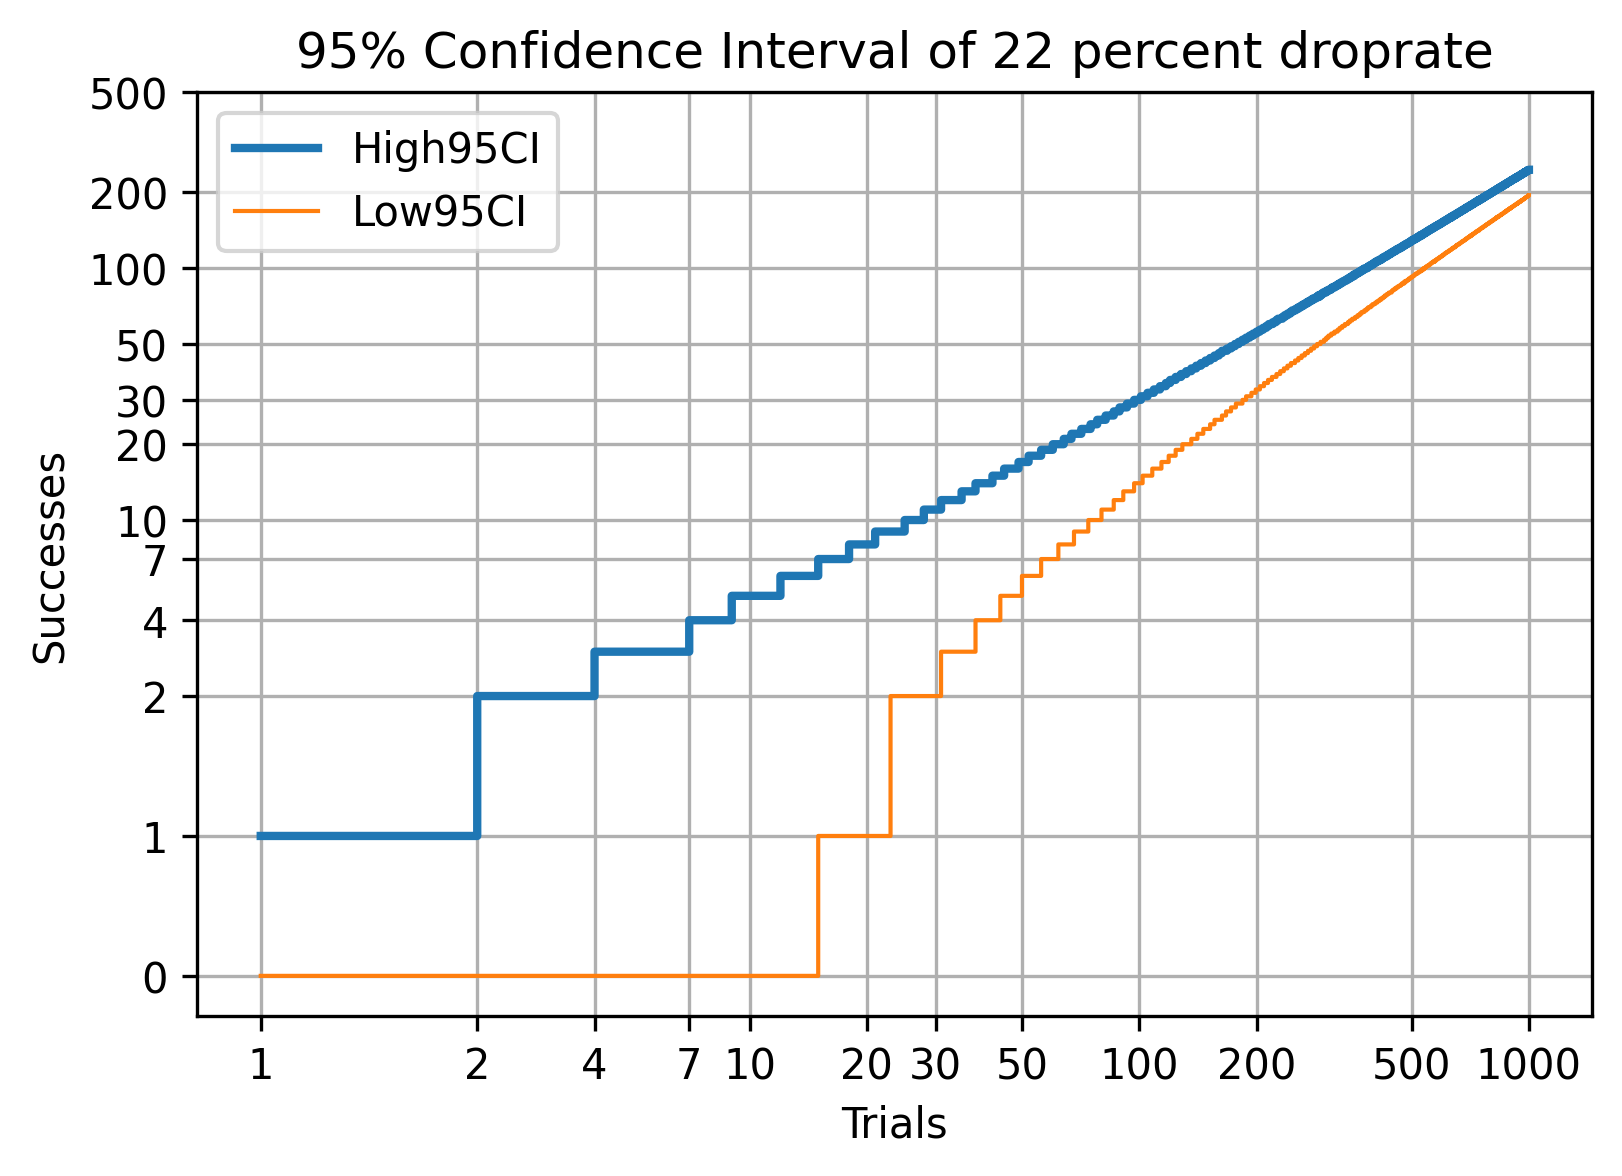
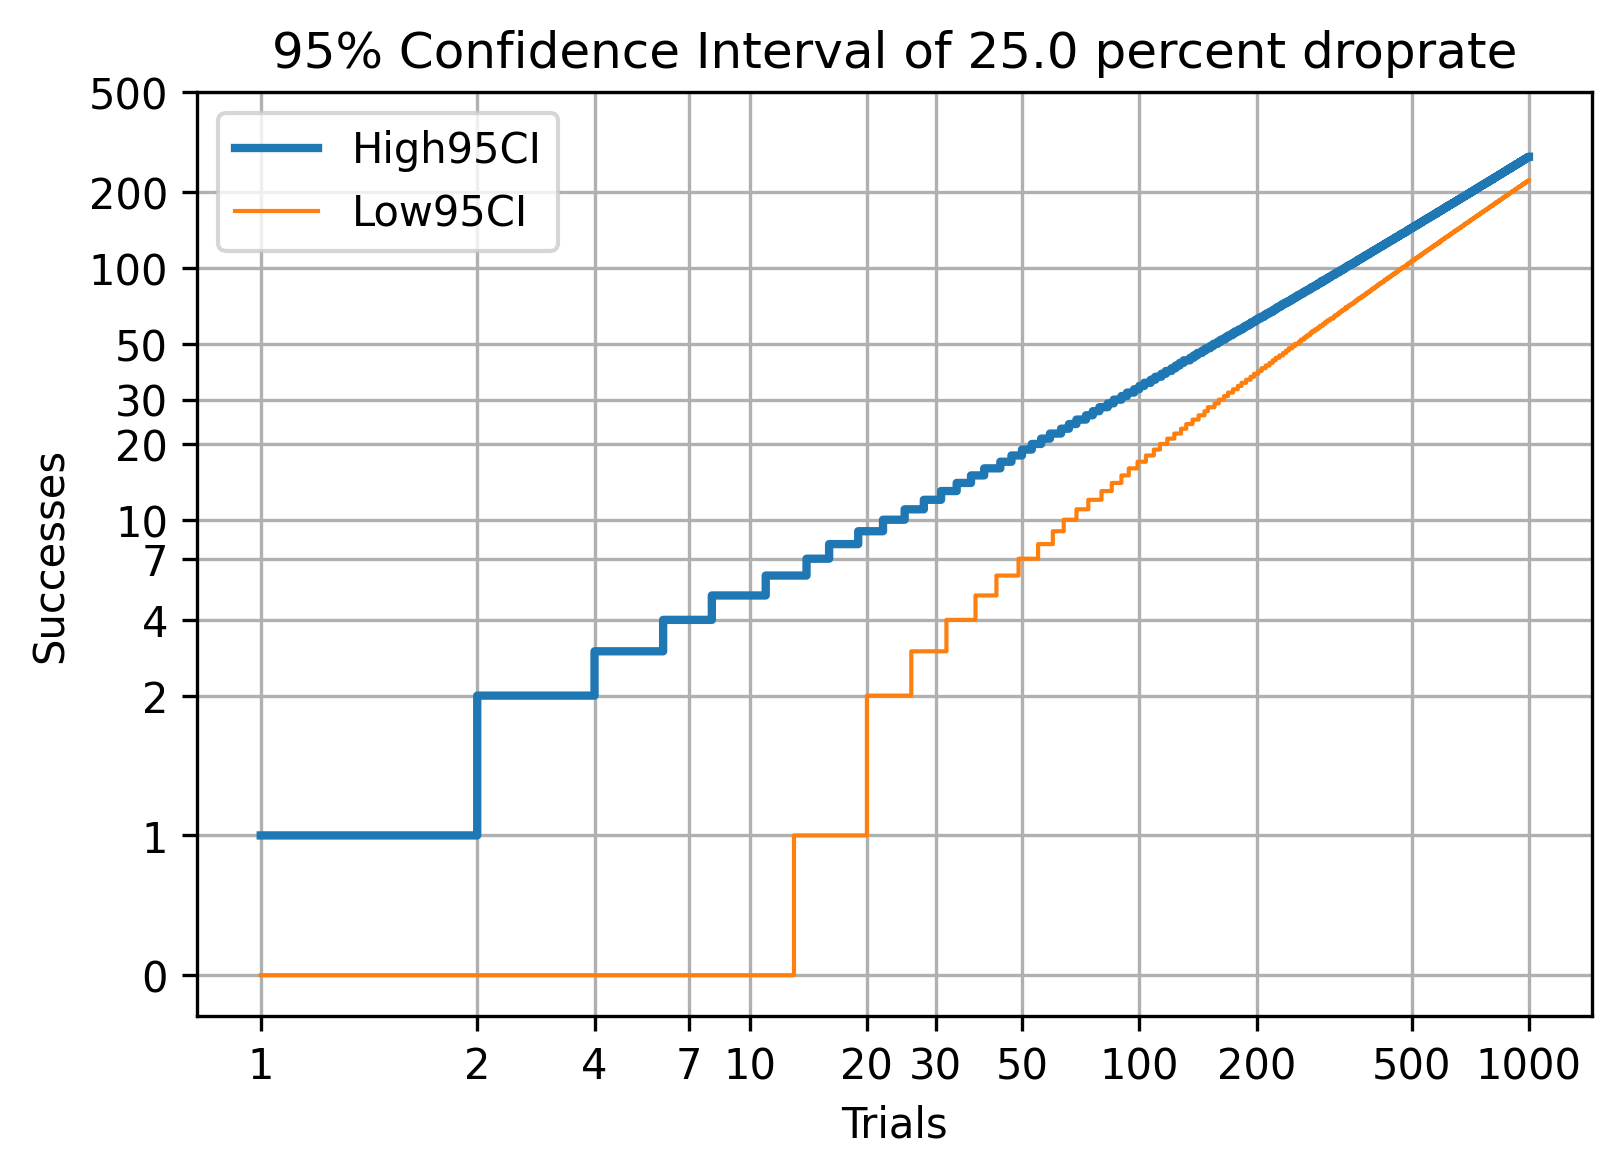
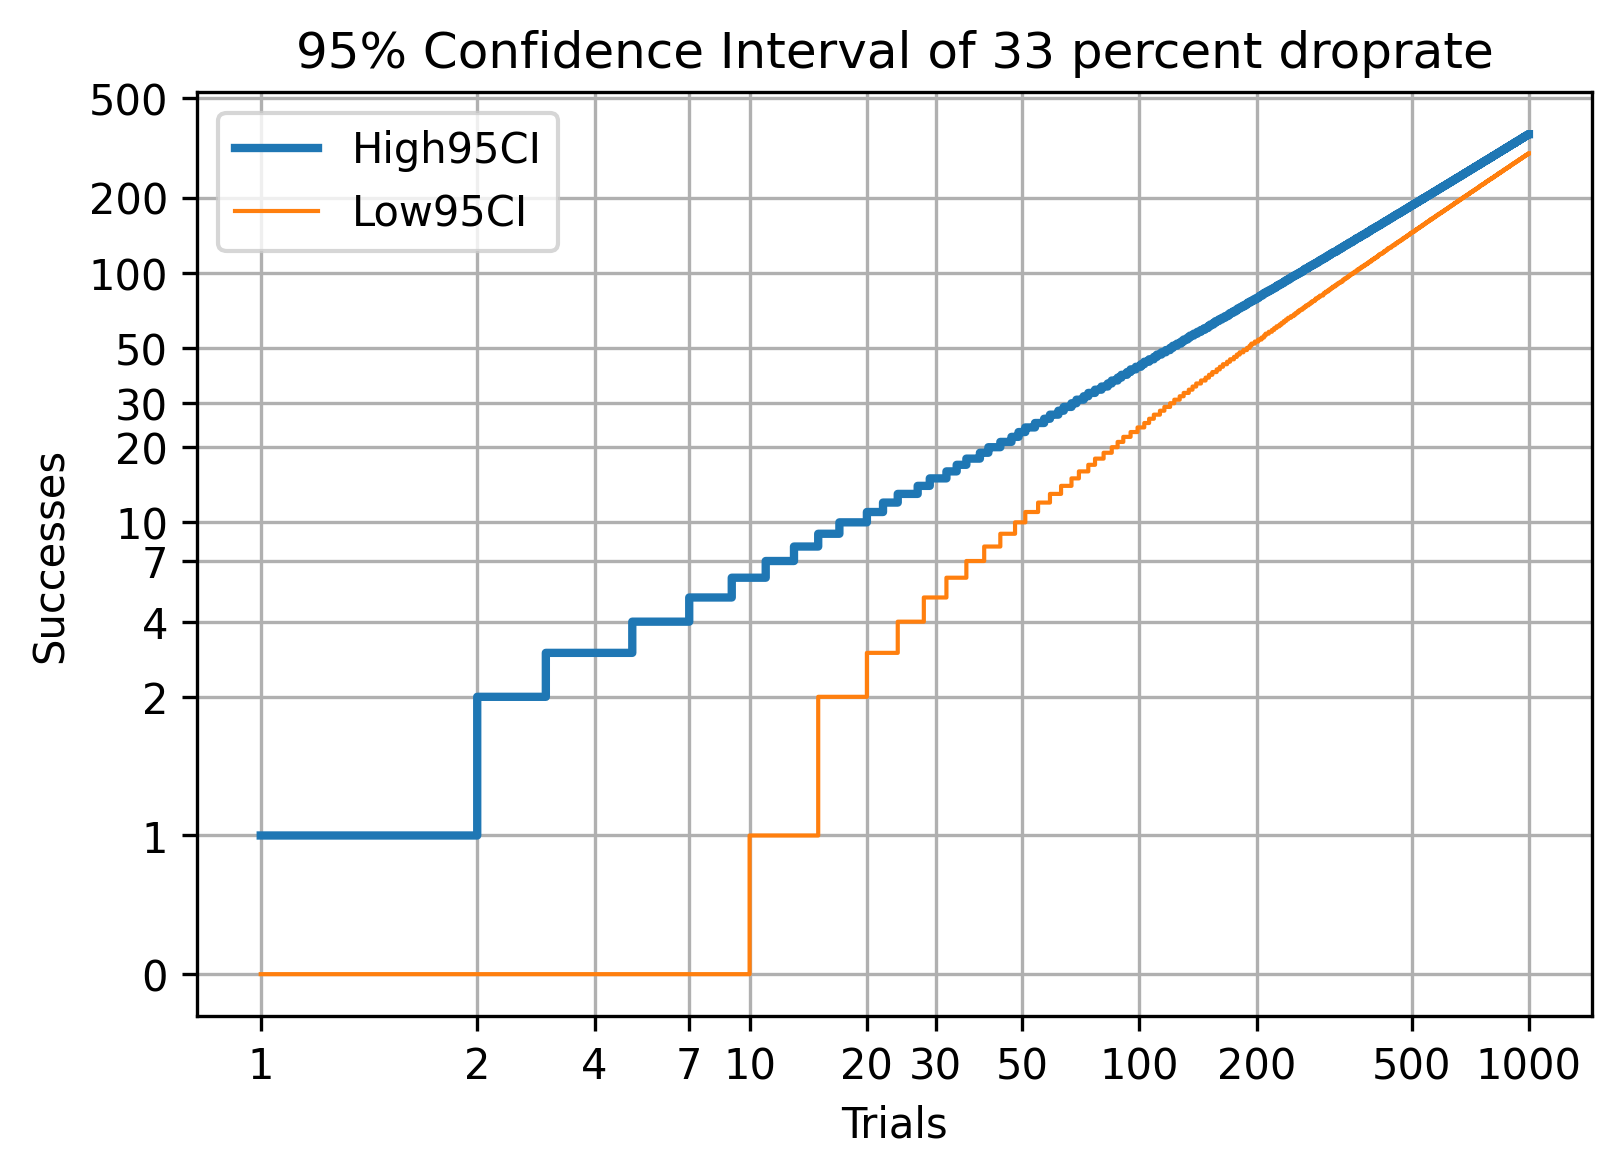
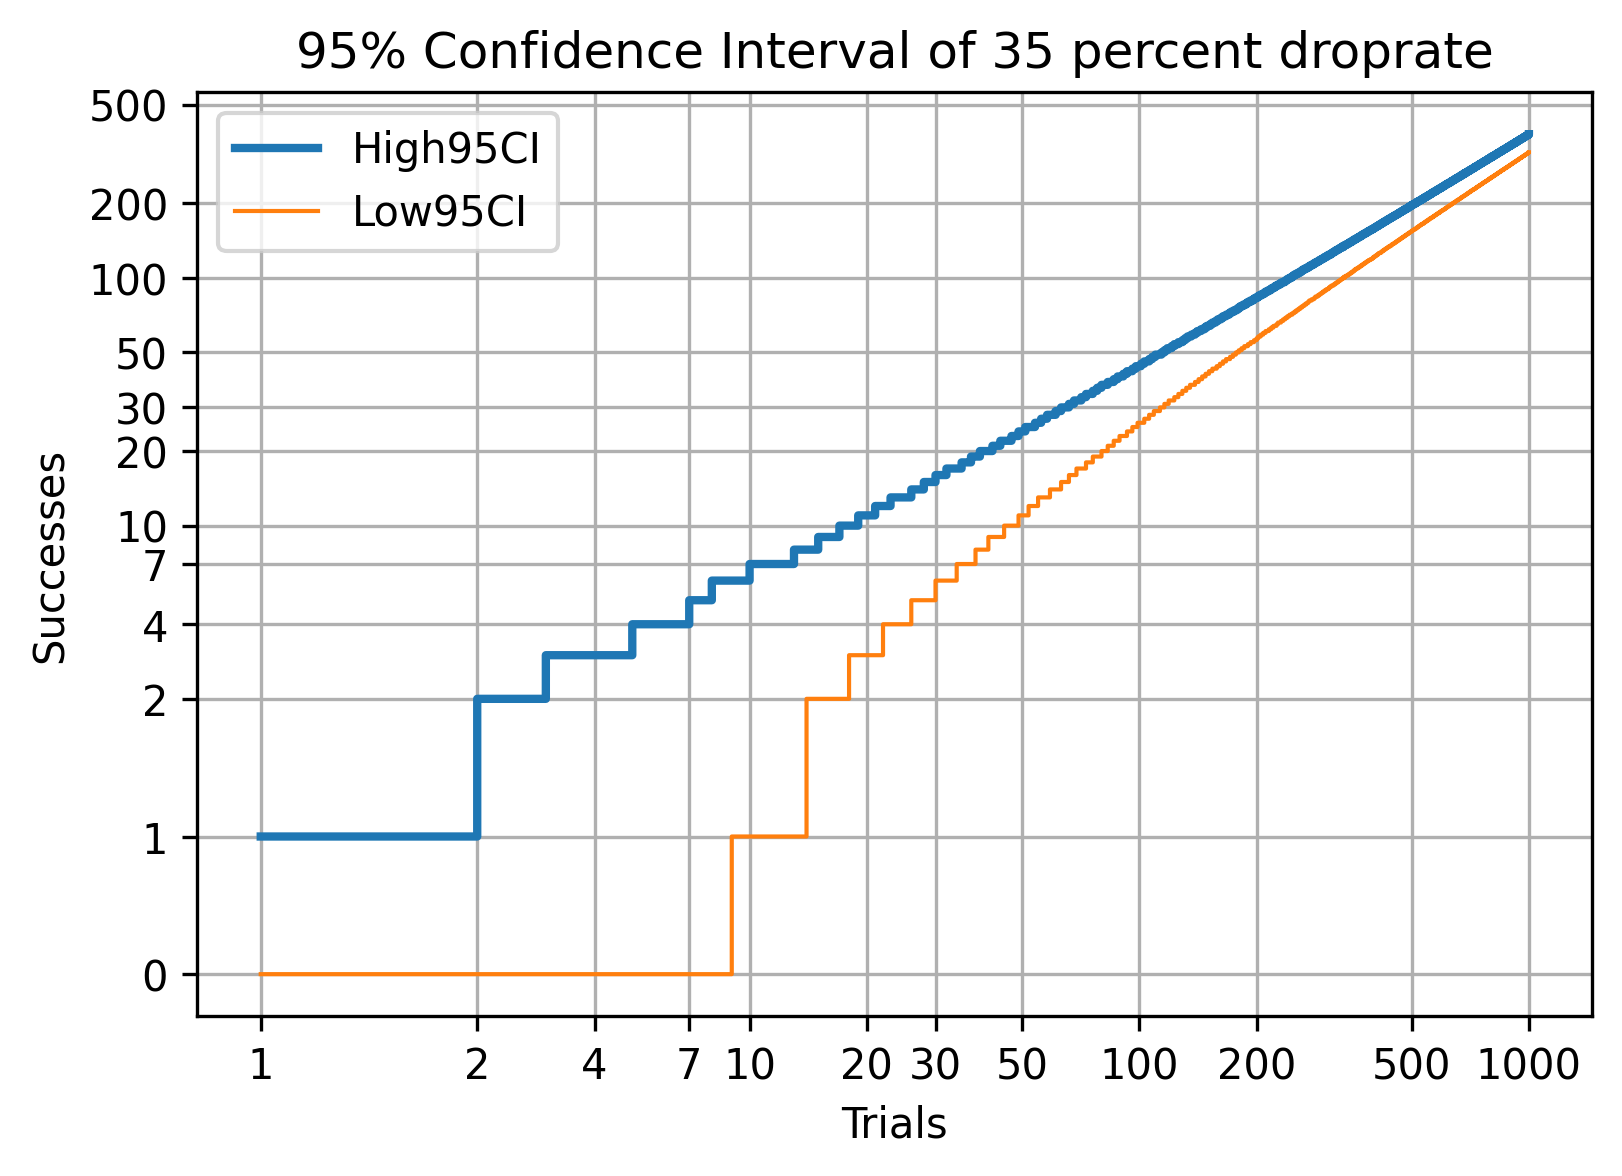
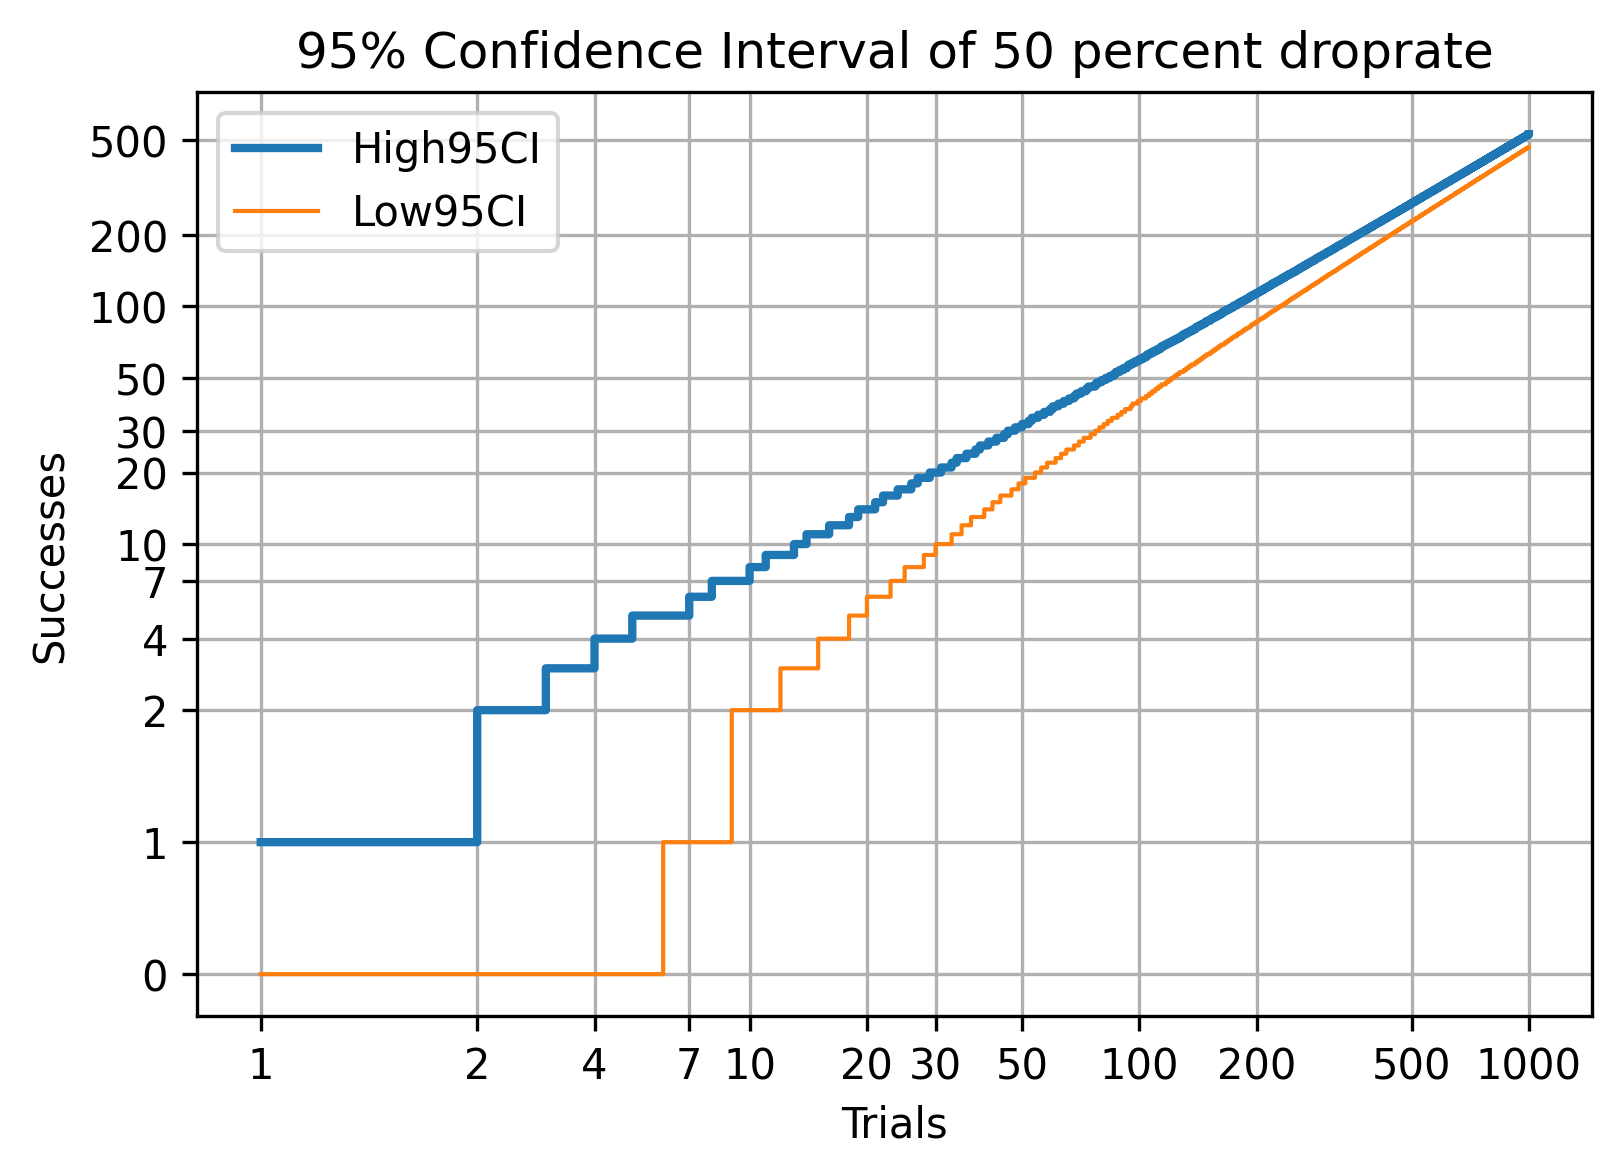
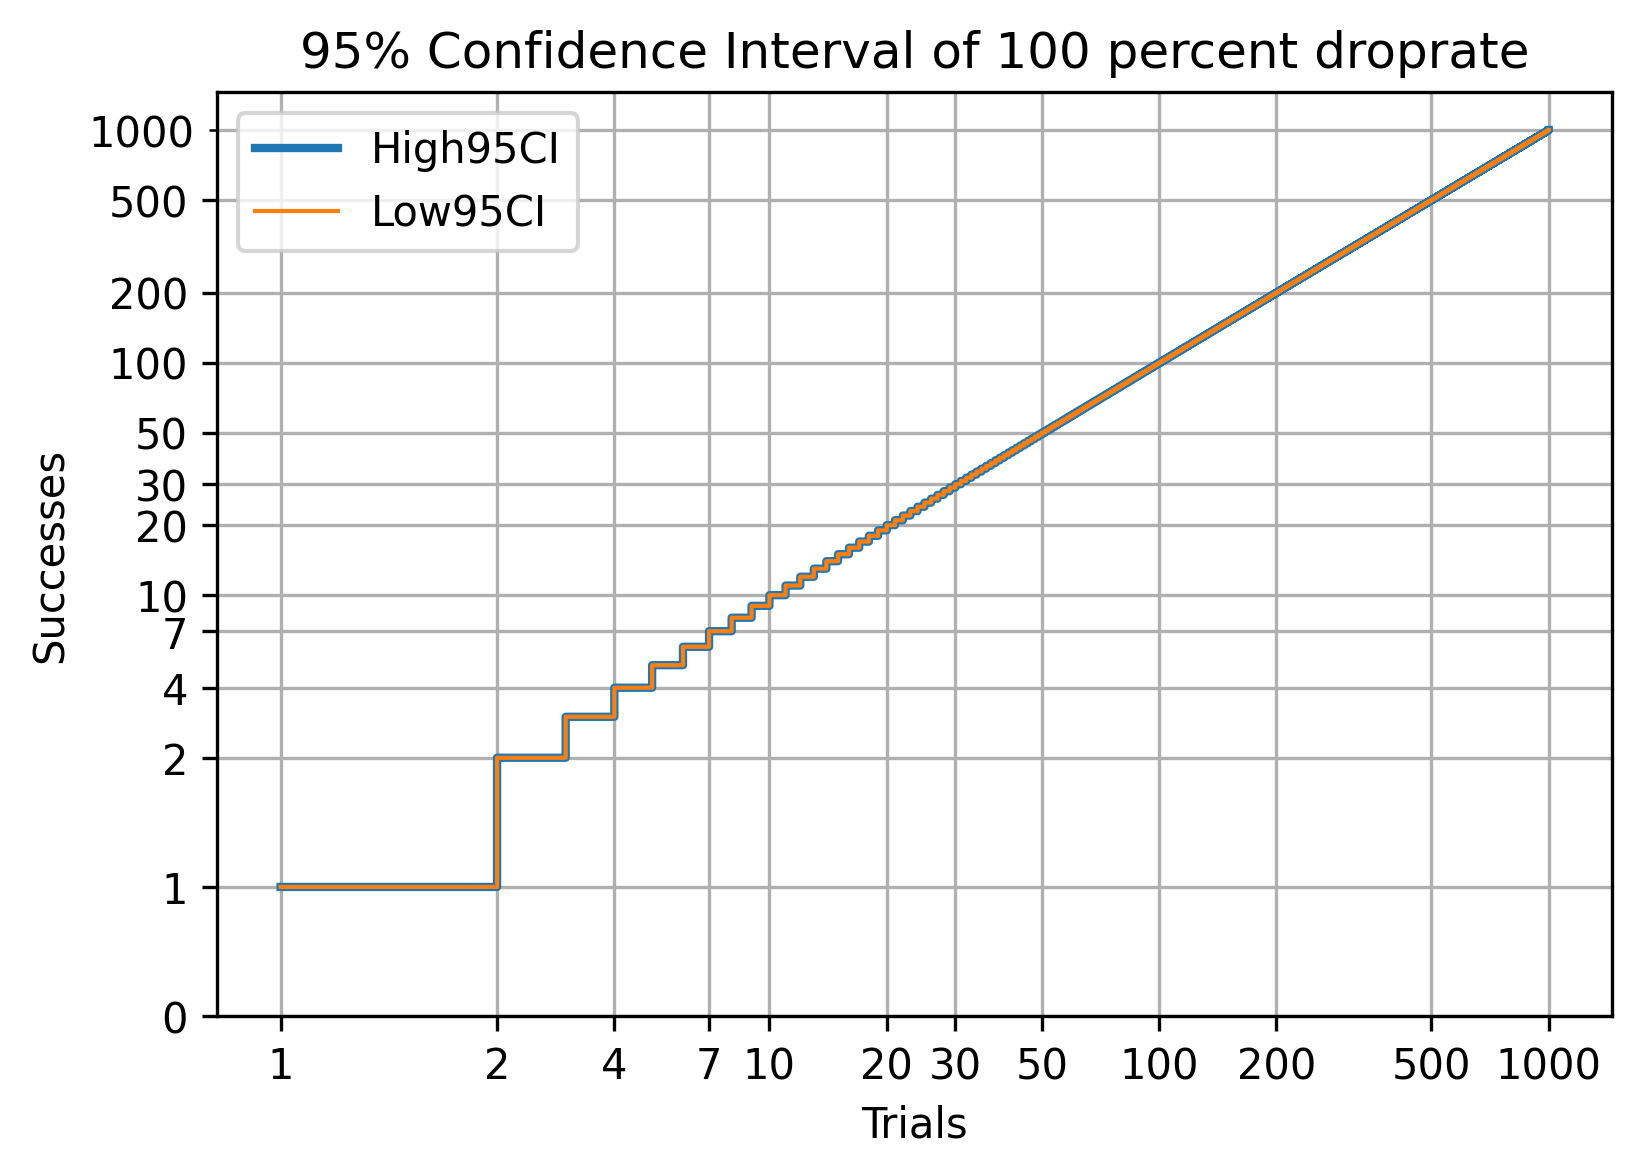
In this post I have plotted the confidence intervals of common drop rates in Borderlands 3.
The blue line will be the top of the interval, this is the largest number of success 95% of players should experience given that many trials, where as the orange line is the lower end of the interval. If you want the average expectation just multiple the drop rate probability by the number of trials. To read the plot choose a number of trials and then follow the line up and see where it intersects the lower and upper bound of expected drops. This is a step plot, so take the final value on that line, since everything is increasing in this plot, take the highest value on the line. This is visually shown in the figure below. We provide 2 examples of determining the confidence interval of 10 trials and 100 trials.
10% Drop Rate CI
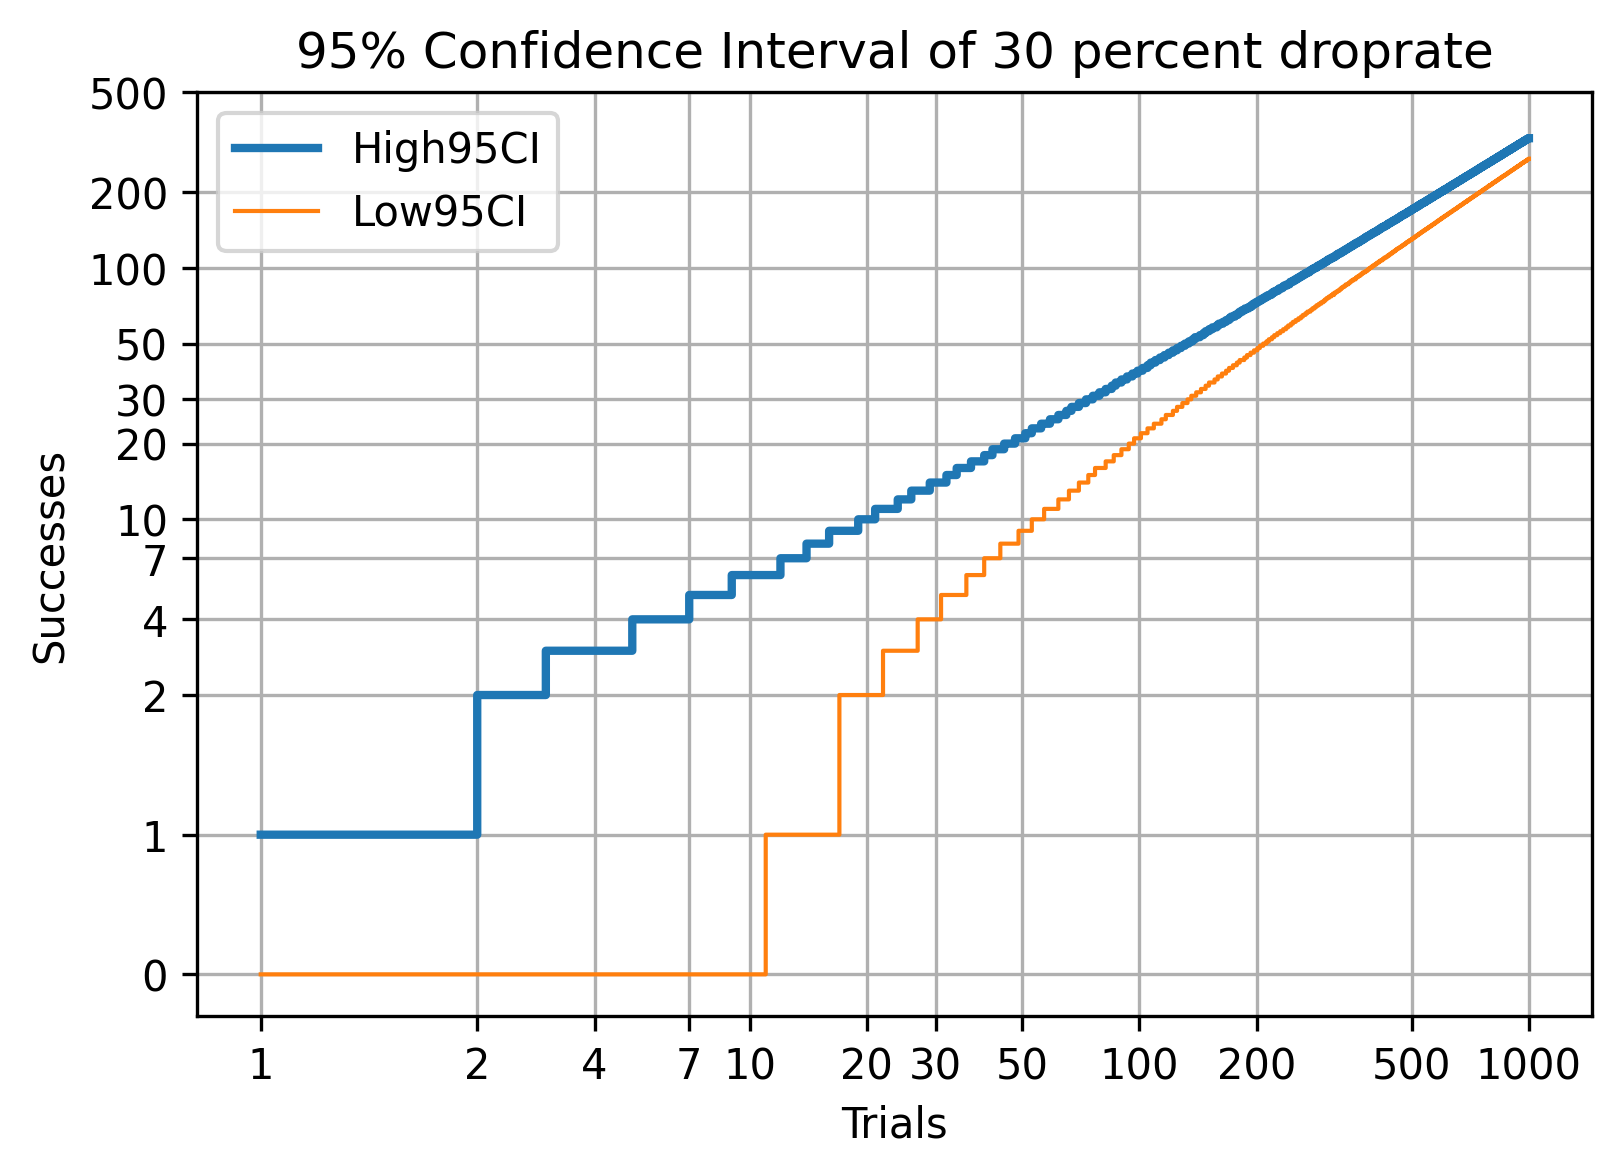
30% Drop Rate CI
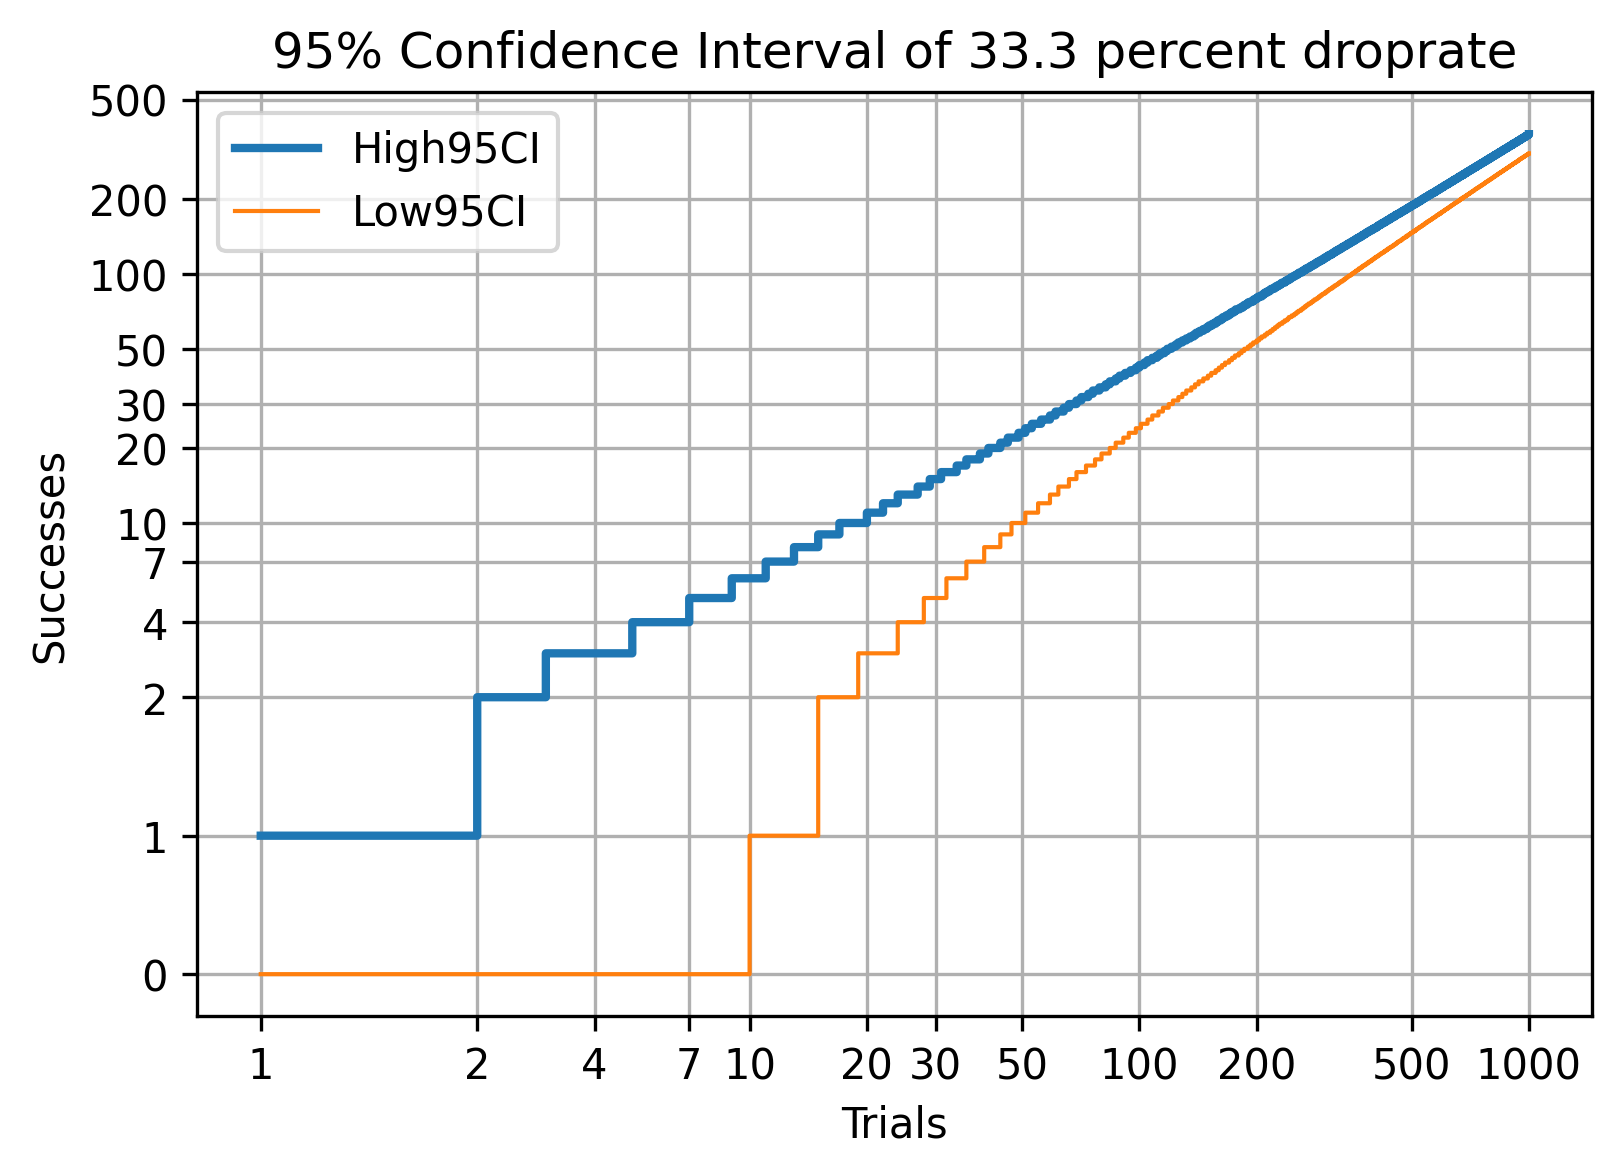
33.3% Drop Rate CI
Annointments
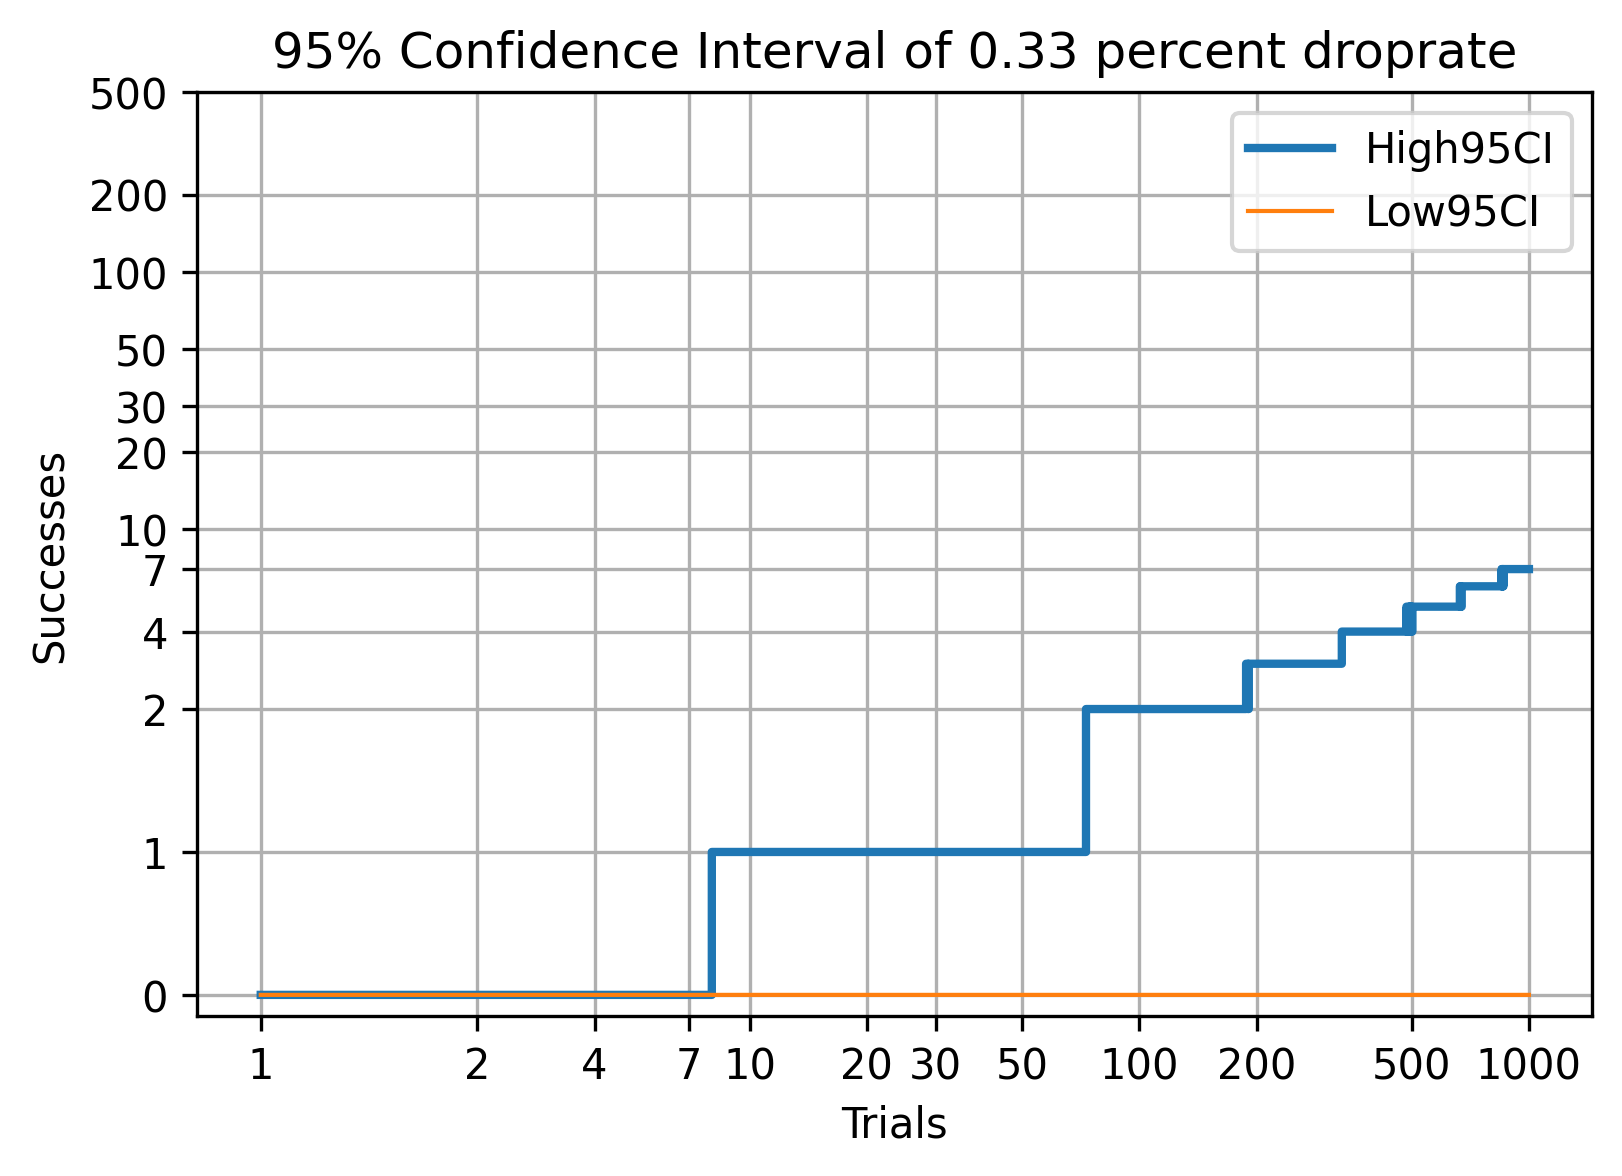
Annointments are hard to count and it’s not clear what the weighted annointment pools are. Without that information I’ll assume we have 30 annointments for weapons and 15 for shields. If you want to know the chance of getting a particular annointment on a specific drop, divide the droprate by the number of annointments, so a “urad” Hellwalker becomes 0.10 / 30 = 0.00333 or 0.333%. That’s pretty rare, you need to get to about 1150 trials before your 95% confidence interval has a lower bound of 1 item.
10% Droprate + Perfect Annointment
CI Calculator
Go here for the calculator itself https://softwareprocess.es/2020/droprates/calculator.html
Confidence Interval Table
If you want a textual table of 1 to 1000 trials for a tonne of probabilities click here:
https://softwareprocess.es/2020/droprate.html
Borderlands 3 Per Item Confidence Intervals
Find your item here to see its confidence interval. I’ve made links to the confidence based on your item’s lowest drop report as reported by on the BL3 Loot spreadsheet (Retrieved 2020-10-16) with contributions by TonyDML, Apocalyptech and FromDarkHell, and BL3 Friendbots.
9-Volt , AAA , Aesclepius , Alchemist , Anarchy , Antifreeze , ASMD , AutoAime , Baby Maker ++ , BackBurner , Band of Sitorak , Bangarang XL , Barrage , Beacon , Bear Trooper , Bearcat , Big Boom Blaster , Bitch , Black Hole , Blast Master , Blind Sage , Blood-Starved Beast , Bloodletter , Bloom , Boomer , Bounty Hunter , Brainstormer , Breaker , Breath of the Dying , Breeder , Brightside , Carrier , Chandelier , Cheap Tips , Chupa’s Organ , Clairvoyance , Cocky Bastard , Cold Warrior , Commander Planetoid , Complex Root , Conference Call , Contained Blast , Convergence , Cosmic Crater , Cosmic Stalker , Crader’s EM-P5 , Craps , Creamer , Creeping Death , Crossbow , Crossroad , Cutsman , D.N.A. , Damned , DE4DEYE , Deathless , Destructo Spinner , Devastator , Devils Foursum , Devoted , Dowsing Rod , Dragon , Echo , Electric Banjo , Elementalist , Embrace the Pain , EMP , Epicenter , Executor , Face-puncher , Faisor , Fastball , Faulty Star , Firestorm , Flakker , Flare , Flipper , Freeman , Frequency , Friend-Bot , Front Loader , Frozen Devil , Frozen Heart , Gargoyle , Gatling Gun , Globetrottr , Golden Rule , Good Juju , Grave , Green Monster , Gungerang XL , Handsome Jackhammer , Headsplosion , Heart Breaker , Hellfire , Hellshock , Hellwalker , Hex , Hive , Hornet , Hunter-Seeker , Hustler , Hydrafrost , Hyperfocus XZ41 , Impaler , Infilitrator , Infinity , ION CANNON , ION LASER , It’s Piss , Jericho , Juliet’s Dazzle , Kaos , Kaoson , Kill-o’-the-Wisp , King’s/Queen’s Call , Krakatoa , Kyb’s Worth , Laser-Sploder , Launch Pad , Lead Sprinkler , Light Show , Lightspeed , Linc , Linoge , Little Yeeti , Loaded Dice , Long Musket ++ , Lovable Rogue , Love Drill , Lucian’s Call , Lucky 7 , Lunacy , Lyuda , Maggie , Magnificent , Major Kong , Malak’s Bane , Messy Breakup , Mind Sweeper , Mind-Killer , Miscreant , Mongol , Monocle , Moonfire , Mother Too , Moxxi’s Bouncing Pair , Moxxi’s Endowment , Multi-Tap , Muse , Mutant , Nagata , Narp , Nemesis , Night Flyer , Night Hawkin , Nimble Jack , Nimbus , Nothingness , Nova Berner , Nukem , Occultist , Ogre , One Pump Chump , Otto Idol , P.A.T. Mk. III , Pain is Power , Peregrine , Pestilence , Phasezerker , Phebert , Phoenix Tears , Plaguebearer , Plumage , Plus Ultra , Polybius , Predatory Lending , Prompt Critical , Proprietary License , Psycho Stabber , Pull Out Method , Quasar , R4kk P4k , Raging Bear , Rakk Commander , Re-Charge Berner , Re-Charger , Re-Router , Rebel Yell , Rebound , Rectifier , Recursion , Red Card , Red Card Re-Charger , Red Fang , Red Queen , Red Suit , Redistributor , Redline , Reflux , Resonant Back Ham , Ripper , Robin’s Call , Rocket Boots , Rocketeer , Roisen’s Thorns , Rough Rider , Rowan’s Call , Ruby’s Wrath , S3RV-8OS-EXECUTE , Safeguard , Sand Hawk , Satisfaction , Sawbar , Scorpio XL , Scourge , Seein’ Dead , Septimator Prime , SF Force , Shocker , Shockerator , Shooting Star , Shredifier , Sickle , Skeksil , Skullmasher , Sledge’s Shotgun , Sleeping Giant , Slow Hand , Smart Gun XXL , Smog , Snowshoe , Soulrender , Spade , Spiritual Driver , Splatter Gun , St4ckbot , Star Helix , Static Charge , Stauros’ Burn , Stinger , Stonethrower , Stop-Gap , Storm , Storm Front , Stuffed Quadomizer , Superball , Surge , T.K’s Wave , Tankman’s Shield , Techspert , Ten Gallon , The Blanc , The Boring Gun , The Butcher , The Companion , The Dictator , The Duc , The Flood , The Garcia , The Horizon , The Lob , The Monarch , The Tidal Wave , The Transformer , Thunderball Fists , Tiggs’ Boom , Tina’s Hippity Hopper , Tran-fusion , Trevonator , Try-Bolt , Tsunami , Tunguska , Unforgiven , Unkempt Harold , Unleash the Dragon , Unseen Threat , Vanquisher , Version 0.m , Victory Rush , Void Rift , Vosk’s Deathgrip , Wagon Wheel , Ward , Warlord , Web Slinger , Westergun , Whiskey Tango Foxtrot , White Elephant , Widowmaker , Woodblocker , Zheitsev’s Eruption
Confidence Interval Plots


Source Code
Do you want to generate your own plots?
https://github.com/abramhindle/droprates
Glossary
- boss - big, bad, end of quest/mission, enemy that you must defeat.
- category - given a reward, what type of reward is it? Categories are ways to take something like items and classify the items into different types. Category is a kind or a type.
- control - trials without a treatment
- dedicated drop - an item is more associated to drop from a boss or only drops from a boss.
- discrete - no in-between numbers, like whole numbers.
- drop - an item that is rewarded from a trial
- drop-rate - frequency of items being rewarded to the player for an action (defeating a boss, completing a quest etc.)
- enemy - usually a computer controlled NPC that is adversarial to the player.
- farm - to repeat a quest or boss fight or encounter in order to achieve an item.
- frequency - number of successes / number of trials (4 monarchs for 100 boss kills is 4/100 or 0.04 or 4%)
- game service - to provide a service to the gamer community of a game by doing something repeatedly to help inform players.
- loot - items that you want
- loot pools - set of items that can drop and associated weights of how common it should drop.
- mean - an average typically the sum of values divided by the number of values
- NPC - non-player character - computer controlled characters in the game.
- null hypothesis - the default of the test, typically for Chi Squared tests this means that there is not a difference between the proportions of categories, for the proportion test it means the difference in proportions are expected.
- p-value - “In statistical hypothesis testing, the p-value[note 1] or probability value is the probability of obtaining test results at least as extreme as the results actually observed, assuming that the null hypothesis is correct.” – Wikipedia, p-value, retrieved 2020-07-07, https://en.wikipedia.org/wiki/P-value
- rejecting the null hypothesis - it means the null hypothesis (the default) is likely incorrect, so it could mean the distributions are different—depending on the test.
- stats - statistics and measurements from testing
- testing - multiple trials (maybe farming) where by counts and or successes are recorded for analysis.
- treatment - when you repeat trials with or without a particular item or effect. For instance does this item improve drop rates, all trials with the item are 1 treatment, all trials with an alternative item are a treatment, and the control trials are treatments.
- trial - a test, 1 run. E.g. 1 boss kill, 1 quest run.
- urad - An annointment on weapons, “While under 50% health, deal 150% bonus radiation damage.”